Showing posts with label kids. Show all posts

Wednesday, May 1, 2013

Scrub a dub dub...-SCIC66

It's May 1st and that means Stampin' Celebration Inspiration Challenge has a new challenge for you!  Here is what I made using the bright inspiration colors:


A page of my daughter and her friend in the bath tub last October.  I used the On thr Go kit for the boat, fish and sun.  The wavy stitches are the Scallop 2 from the Staples and Stitching and the big title font is A Song for Jennifer and the small is Eternal Promise.

Here is the inspiration piece for May:

What fun bright colors for this month! 


To follow along on this month's Blog Hop, simply click the links below:
Allison Ohran -Sweet Impressions
Cori Kozak - Creative Chat
Erica Cerwin - Pink Buckaroo Designs
Erin Gonzales -Hand Stamped Style
Jenny Peterson - Lakeshore Stamping (taking a break in Grand Cayman this week!)

You have until May 25th to play along.   And don't forget to check back on the 15th for some more inspiration!!


Friday, October 5, 2012

Foot Print Witch- MDS Blog Hop

Welcome to the MDS Blog Hop! This week we are making Halloween themed projects!  I can't believe Halloween is right around the corner already!  I had fun with my post card this week.  I was looking at Halloween ideas on Pinterest and came across an adorable little foot print witch.  I knew I wanted to make one, but my daughter was already in bed, so I used MDS to create a digital one!  Here she is!


Isn't this just the cutest idea?!  I love seeing all the hand/foot print "things" you can make out there.  I am not sure if this idea is feasible for my daughter yet...the two toned foot paint maybe a little to much for a mommy and a 9 month old to handle, but this digital rendition makes me happy!

I used the Baby Prints stamp set and then used the coloring tool to color the heal part Blush Blossom.  The arms are from the All in the Family stamp set and I used the Freeform Brush to draw the broom, hair and hat.  The Freeform tool was perfect for the "handmade" feel I was going for with the project! 

What do you think?


Are you ready to hop on over to the next blog? The easiest way to do so is to click on the name right below mine, so that would be Mandy and then from her blog hop on over to Julie's blog and so on until you have hopped a full circle back to here!


Tuesday, August 2, 2011

Lucky Limade Grass-My Digital Studio- cqc96


It's Tuesday and that means I made a scrapbook page using My Digital Studio with this week's colourQ colors! If you want more info on this fabulous program...let me know! And if you think you are not a digital scapbooker...there are WAY more things to do with this fabulous program that to scrapbook!

(Click on the page to see it bigger and to see all the little details!)

This week we have some refreshing colors to work with and I found these amazing-ly perfect pictures that my cousin took of her nephew to use with them! The colors are Tempting Turquoise, Bashful Blue, Lucky Limeade (brand new color!!!), Basic Gray and White. The font I used was CAC Pinafore.

We would love for you to play along with us this week! Need some inspiration? Make sure to check out the design team members projects on the colourQ site too!

Thanks for looking!

Saturday, July 30, 2011

Non-Winning Artisan Award- Whoa MDS Page


Here is another scrapbook page I made for the Artisan Award contest. It is a 100% My Digital Studio page. (Click on the page to make it bigger!)

It measures 8" x 8" and features my cousins cute little boy Alex playing and discovering a new dump truck.

This page came together quickly as I used some DSP from MDS and then added a few extra "stamped" elements, embellishments and lots of shadowing. I also played with the color of the pictures to make them more muted to make them go with the DSP.

I am so happy my cousins have cute kids for me to use to scrapbook with! :)

Thanks for looking!
if you were at convention you may have seen this page on the display boards...it was there!

Tuesday, July 26, 2011

Non-Winning Artisan Award- Baby Wyatt Page

Here one of the scrapbook pages I made for the Artisan Award contest. It is a 12x12 page featuring my cousins little boy Wyatt just a few weeks old. (Click on the scrapbook page to see it bigger!)

I couldn't make up my mind with this page, I had the basic layout there and then kept adding the different elements to it until I though I was satisfied. I think it came out good.

I used various different mediums on this page including wood sheets, fabric, card stock, vellum and shimmer smooch spray.

I wasn't sure of the butterflies on a baby boy's page, so I added the wood sheet butterflies to it too, I think it added a little bit more of a masculine feel! :) What do you think?

I die cut the "wyatt" letters using the big shot and chipboard covered in Whisper White card stock. The journaling was done on MDS and then printed and popped up using dimensionals on the page. It is super hard to see in the pictures, but the whole page was mounted onto a piece of the Presto Prints Specialty DSP that gave it a little bit more interest and depth!

I was happy with the way this page came out!

Thanks for looking!
if you were at convention you may have seen this on the display boards...it was there!

Tuesday, July 19, 2011

discovering...- cqc94


It's Tuesday and that means I made a scrapbook page using My Digital Studio with this week's colourQ colors! If you want more info on this fabulous program...let me know! And if you think you are not a digital scapbooker...there are WAY more things to do with this fabulous program than to scrapbook!

(Click on the page to see it bigger )

This week we have some bright weird, to me, (colors I would NEVER put together) colors to work with, but as soon as I saw them I remembered about this cute picture of my cousins little boy and him wearing a green onsie and playing with a tennis ball....perfect!!

So I started playing with the other colors in this weeks challenge and this page came together!

I hope I have inspired you to pull out your colors and to get crafty to make a project and share with us over at the colourQ!

Thanks for looking!

Click here to order Stampin' Up! supplies 24/7!

Saturday, June 11, 2011

Hoola-Hooping Birthday! CCMC-SUM04

It's the end of week 4 over at the Create with Connie and Mary Summer Edition and that means we only have one more week left!

This week's Saturday challenge is a sketch challenge. Here is what I came up with. I decided to use the Recess stamp set and not go with the recess theme, but rather the girl birthday theme. I think it worked out okay.

The colors I used were Crumb Cake, Pink Pirouette and Very Vanilla. My card measures 4 1/4" x 4 1/4". I like making this size of card because it still fits into a normal envelope and doesn't take any extra postage.

Here is a close up of the main image and the ribbon. Nothing too crazy on this card, but just straight to the point!

I hope you have time to create with us this week at the Summer Edition!

If you haven't already signed up for the Summer Edition, it is not too late! You will still be able to see all the projects that we have already shared and the projects still to come! This is such a great resource for fun projects that include full tutorials for every single one!! Hope to see you over there soon!

Thanks for looking!

Click here to order Stampin' Up! supplies 24/7! Make sure to check out the retiring products as well only available through the end of June!

Saturday, May 28, 2011

Ur7!- CCMC-SUM02

It's Saturday and that means it is time for another Saturday Challenge from the LinkCreate with Connie and Mary Summer Edition! This week we have a sketch challenge.

Here is my fun bright card for a special 7 year old that had a birthday this past week! I used the Touch of Kindness stamp set, Melon Mambo, Tempting Turquoise, Daffodil Delight and Water Color (white) papers to make this card.

I also had fun adding embellishments to it like the Basic Rhinestone "diamonds", the 5/8" Daffodil Delight ribbon and the texture from the Big Shot Perfect Polka Dots embossing folder.

I even decorated the inside of this card, which I do not do very often, to make it match the bold bright-ness of the front of it. Here it is.

This card was fun to put together because of all the bright colors I used that I normally do not use all at the same time!

Here is the sketch for this week. What a fun one to work with!

Do you want to get in on the fun creative projects and tutorials we have been sharing for the past few weeks? Yes...then you need to head over to the Create with Connie and Mary site and subscribe to the Summer Mini Edition!

Don't worry, even though we already underway, you will still be able to see all of the projects from the past two weeks as well as all the projects from the coming 3 weeks no matter when you subscribe! Oh by the way...the Saturday challenges are the only projects that we share with everyone...become a subscriber to see all the other projects and tutorials and to get chances to win two FREE $75 gift certificates or one of two FREE subscriptions to the next Holiday Edition!

Thanks for looking!
and I hope to see you over at the CCM Summer Edition soon!


Click here to order Stampin' Up! supplies 24/7! and don't forget the Summer Mini is now available to order from too!

Friday, April 8, 2011

Onesies for Trace- SCIC47

Yesterday was Thursday and that means time for another Stampin' Celebration Inspiration Challenge! This week we are celebrating cute little animals, strips and polka-dots! We hope you are inspired to make something and share it with us over at the Stampin' Celebration blog!

This week's inspiration pictures were perfect for me as I needed to make a welcome baby gift for a friend that had a baby boy recently!

Here is what I came up with a bag with a few personalized onesies for him to wear all tired up with a cute giraffe tag! I had so much fun making the tag and the onesies!

Here is a picture of the onesies I made. The first one has his name that I die cut using the Big Shot and the iron on adhesive and then just ironed it on the back of the onesie. The second one I made a tie
(figured it was appropriate since he is the only boy with two older sisters!) on the front of the onesie. I made the tie by using a template I drew my hand and then again used the iron on adhesive to attach it to the onesie.

Here is a close up of the So Saffron punch art giraffe I made for the tag. I used various Stampin' Up! punches to make him
(Hint...the head is the Owl Punch!). I made a tree for him to nibble on using the two step bird punch and a few hearts in Pear Pizzazz and then mounted it all onto a piece of Baja Breeze card stock that I sponged clouds onto.

I really had a great time making this entire project and I hope Mom and the new baby enjoy it!

Thanks for looking!

Click here to order Stampin' Up! supplies 24/7!

Sunday, March 6, 2011

A Note From Erin....


I was asked by "Aunt" to make a personalized set of note cards for her nieces 6th birthday. Aunt said niece has everything and knew this would be a great gift since she is learning how to write. She told me she was a girly girl and was all about princesses and pink and purples, so I went to work using the Pretty Princess stamp set! (I had to borrow this retired set from a stampin' friend, hi Susan! :) )

I used Rose Red and Pretty in Pink as the main colors and then used various Stampin' Write markers to color the images.

I printed out the "A note from Erin" on Whisper White card stock and then mounted it to a piece of Rose Red card stock.

Once I had all 8 cards made, I knew a 6 year old would need something to keep her cards in, so I made a sparkly Iridescent Ice monogrammed "E" box for her to keep them in.

I liked the way the cards and box turned out and I think they probably made a great special gift for Erin!

Thanks for looking!


Click here to order Stampin' Up! supplies 24/7! remember for every $50 you spend you get to choose a FREE Sale-A-Bration product from the SAB catalog!


Thursday, September 23, 2010

Circled Fellows- SCIC21


It's Thursday and that means it is time for another Stampin' Celebration Inspiration Challenge! This week we are celebrating with these fun-bright-kind-of girly outdoor party inspiration pictures! Be sure to check out the Stampin' Celebration blog and the other design team members projects this week.

Here is what I came up with, Circled Fellows! As you can see I pulled the colors from the top left inspiration picture and used them on my card. I used Wild Wasabi, Pretty in Pink, Peach Parfait, Very Vanilla and Crumb Cake. The little animals are from the level 2 hostess set Long Fellows.

I stamped each animal onto water color paper using Black StazOn and then colored them in using the appropriate markers and then used my blender pens to blend and soften them. Then I punched them out using the 3/4" Circle punch and mounted them on to the Crumb Cake card stock using Dimensionals. I added a Very Vanilla Satin ribbon and bow to the card to finish it off!

Here you can see the dimensionals popping the animals off the card a little bit.

Thanks for looking!
I hope I inspired you to play along with us this week!

And be sure to check out the Create with Connie and Mary blog...the preview period and early bird special is going on now...you do not want to miss it!

Thursday, September 2, 2010

Pirate Pelican- SCIC18


It's Thursday and that means its time for another Stampin' Celebration Inspiration Challenge! This week we are celebrating the end of summer (can you believe it.....already?) with these beach-y inspiration photos. We also have some exciting new over on the Stampin' Celebration blog....we have a new Design Team member...it is Erica Cerwin of Pink Buckaroo Designs! Be sure to check out her blog...she does great work! And be sure to check out all the other Design Team Members projects this week too!

Here is what I came up with! This card just kind of made itself as I went! I started off with the log-buoy things (anyone really know what they are called?) and then I thought Pelicans are always sitting on top of them..right? and then he became a pirate! I did change the pelican up just a teeny tiny bit, but I have to give credit to Ellen Kemper for the pelican inspiration....Ellen is an incredible punch art artist! Go check her blog out!

The colors and supplies I used on my card are Not Quite Navy for the sky, the Scallop Edge punch and Marina Mist card stock and ink for the water, the Wood Grain background stamp and Crumb Cake card stock and ink for the log-buoy things, the Extra Large Oval, Large Oval, Word Window and Butterfly punches with Whisper White card stock that was sponged with Crumb Cake and Basic Grey inks for the Pelican body, the Boho Blooms flower punch and Extra Large Oval punches with Daffodil Delight card stock that were sponged with Peach Parfait ink for the beak and the feet. The "ahoy" letters were die cut using the Big Shot and the Timeless Type Alphabet die.

Thanks for looking!
and I hope you decide to play along with us this week!

Thursday, August 26, 2010

Reagan's 6th Brithday Cupcake Pin- SCIC17

Stampin' Celebration has another fun Inspiration challenge this week! The inspiration photos are very girl birthday-ish in my mind! I would love to see what your take would be on this weeks inspiration photos...so go create something and share it with us on the Stampin' Celebration blog! Oh and while you are there take a look at the other design team members creations this week too!

Here is what I came up with! It is a card and a special birthday girl pin all in one! The card measures 4 1/4" x 4 1/4" and the colors I used were Whisper White, Pretty in Pink, Melon Mambo and of course some sparkle! The "swirls" on the card base were stamped in Pretty in Pink on to the Whisper White card stock using the Priceless Stamp set.

I die cut the cupcake using the Big Bold Cupcakes Sizzlits die a few times with the appropriate color card stocks and then glued the layers together to make the cupcake a little stiffer and sturdier, since it is going to a 6 year old! :) I embossed the "frosting" with a clear and dazzling diamonds embossing powder mix to give it a little sparkle and interest. The 6 on top was die cut using the Big Shot and the Timeless Type Junior Alphabet and embossed with clear embossing powder.

I added a Melon Mambo bow around the base of the cupcake and a pin to the back, so she can wear it ALL day, and the pin was done! Here is a picture of just the cupcake.

Here is what the card looks like when it is open. You can see that the cupcake pin comes off the card base easily.

Thanks for looking!
and I hope to see you over at the Stampin' Celebration blog soon!

Thursday, July 29, 2010

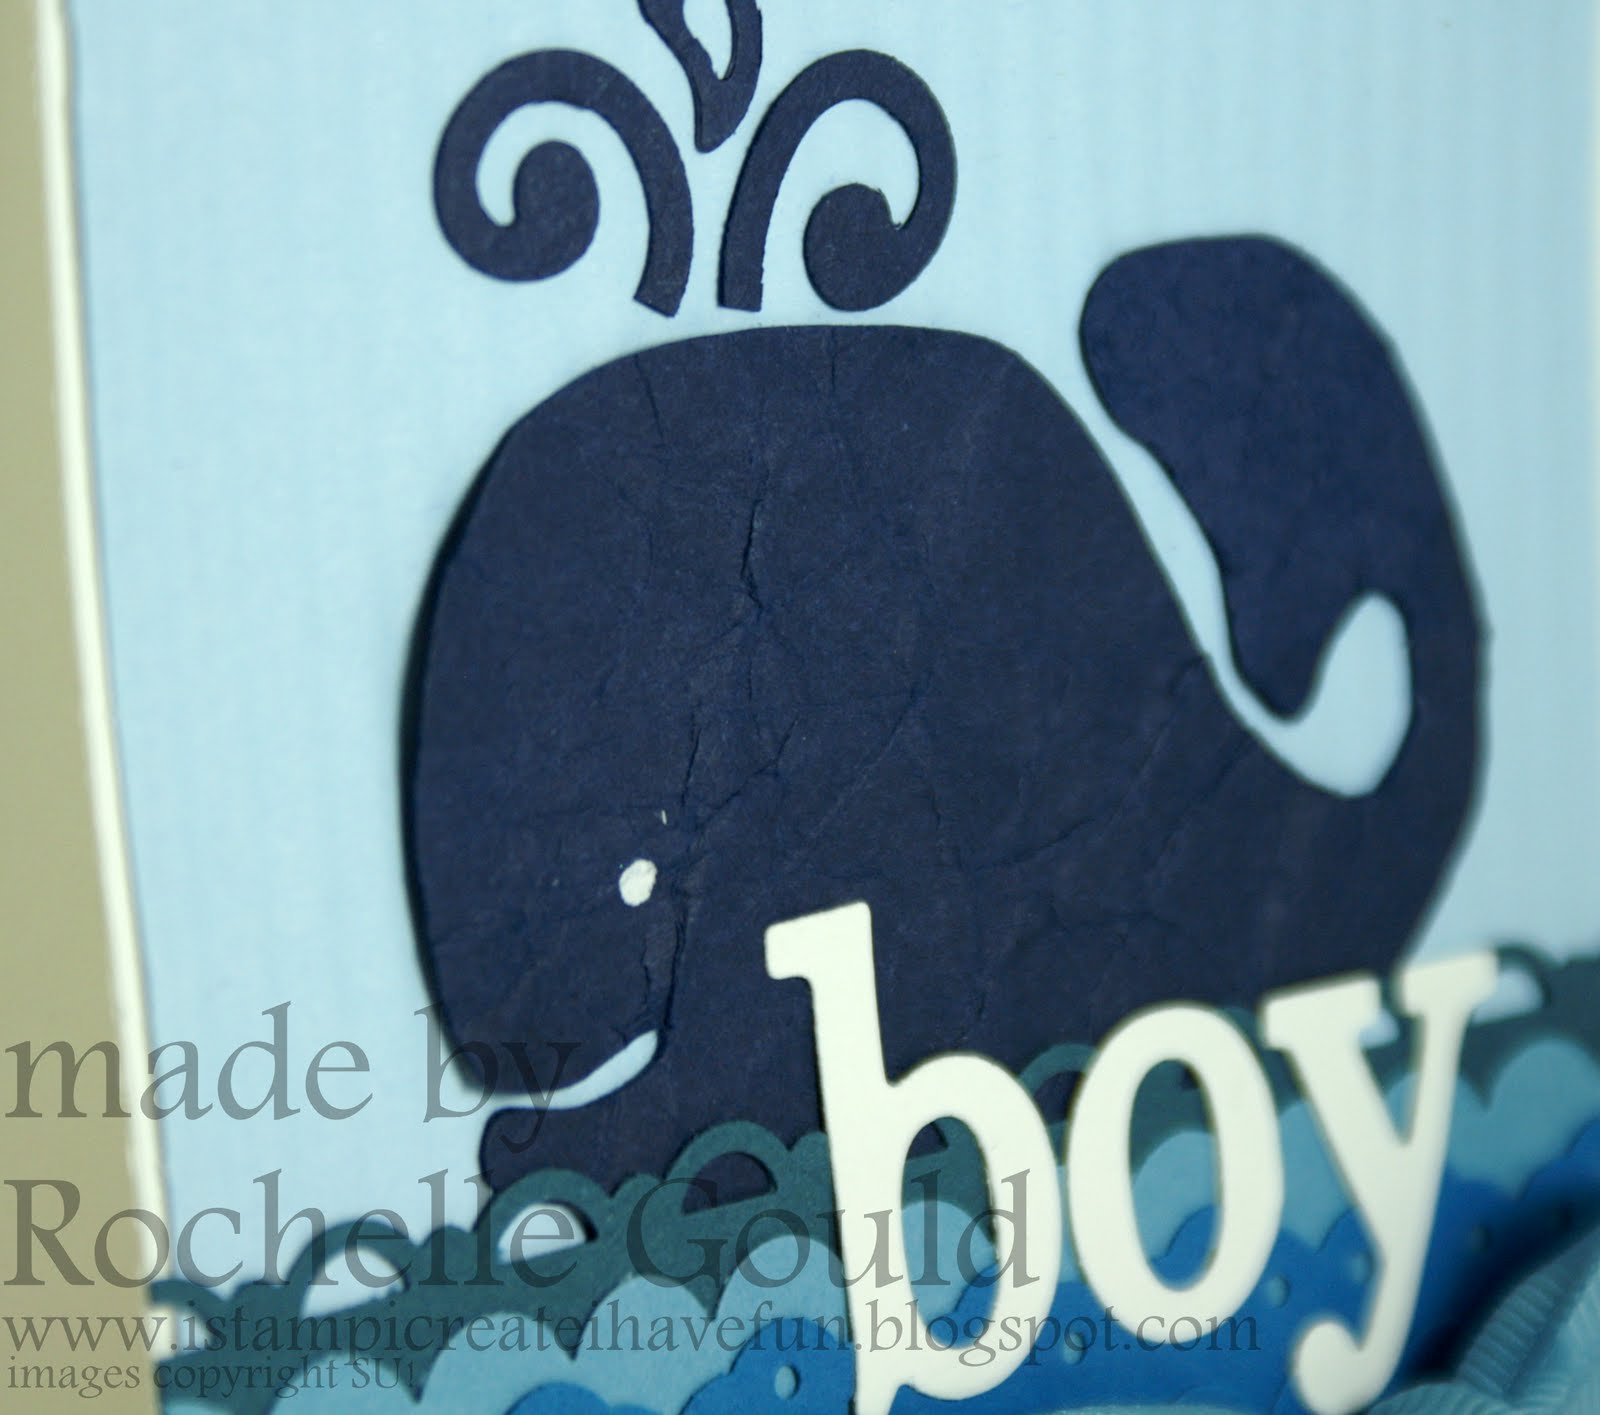
Blue Whale Boy card- SCIC13


It's Thursday and that means it is time for a new Stampin' Celebration Inspiration Challenge! This week we are inspired by this fun beach-y themed group of pictures. We would love to see your creations using this picture as inspiration. Just head on over to the Stampin' Celebration blog and link your project! While you are there make sure you check out the other Design Team members projects this week too!

Here is what I came up with this week, a blue whale boy card! This is not where this card was going when I started, but it just kept leading itself in this direction, so that is where I took it! I used five different blues from Stampin' Up!. They are Bashful Blue (sky), Night of Navy (whale), Not Quite Navy (Scallop Trim Border wave), Marina Mist (Scallop Edge Border wave) and Pacific Point (Eyelet Border wave).

The Bashful Blue sky background was sent through the Crimper to give it some interest. I made the waves by layering the different punches on top of each other and then I added the 5/8" Marina Mist ribbon as a final touch. The Whale was a image I printed off the computer and then transferred it onto a piece of Night Of Navy card stock, cut it out and crumpled it up to give it a little texture.

The "boy" was die cut with Whisper White card stock using the Big Shot and the Timeless Type Alphabet.

Here is a close up of some of the detail. I hope you can join us this week!

Thanks for looking!

Thursday, May 13, 2010

Happy Birthday Human- SCIC02


It's week two already over at the Stampin' Celebration blog! This week the inspiration comes from this fun robot party. The inspiration photo says boy birthday card to me, that that is what I made!

I used the Lots of Bots stamp set to make this card. I stamped the robots onto Whisper White card stock and then colored them using the Stampin' Write markers in Real Red, Only Orange and Yoyo Yellow. I mounted them onto Brilliant Blue card stock and arranged them on the Real Red card stock that was sent through the Big Shot with the checkered texture plate (very hard to see in the picture).

The three circles on the right were punched out using the 1" circle punch and then stamped with Real Red ink and the "robot language"? (I do not know what it really is!!) stamp from the Lots of Bots set. I finshied off the card by adding the sentiment and mounting the Real Red card stock onto a Brilliant Blue card base.

Be sure to check out the other Design Team members "out of this world" projects this week over at the Stampin' Celebration blog!

Want to join in on the fun? No problem...all you have to do is make a project inspired by the inspiration photo above and post your completed project to an online gallery or your blog and submit it over at the Stampin Celebration blog!

Thanks for looking!

Sunday, February 21, 2010

Resisted Extreme Boarder - cQc#20


Arielle has a fun color combo this week for her Colour Q color challenge. The colors are Real Red, Brilliant Blue, Tempting Turquoise, Yoyo Yellow and Whisper White. All of the colors are from Stampin' Up!'s Bold Brights color family and I typically do not use much of these colors, so this was fun!

I recently got the Extreme Snowboard stamp for free from Sale-A-Bration, and I thought these bright colors would go great with this stamp. So I embossed the snowboarder onto Whisper White Card stock using Versa Mark and White embossing powder.

I then took the Seeing Stars stamp set and the snowflake stamp from the Holiday Blitz stamp set and stamped all around the snowboarder in all of the ink colors from this weeks challenge. The ink doesn't stick to the embossed part, which is called embossing resist. I then took a damp baby wipe and lightly smeared the stamped images a little bit.

The sentiment is stamped in Basic Black and is from the retired stamp set It's Your Birthday, which is fitting, since today is my Birthday! So I made a birthday card on my birthday, but I wouldn't say that I made it for myself, it just doesn't look like a card for me!

Thanks for looking!

Monday, February 1, 2010

Friends Birthday- CCCCAct15


This week over at Stacey's Stamping Stage she was inspired by this bouquet having Lavender Lace, Pumpkin Pie, Whisper White and Garden Green in it. There are a few colors in that group that I don't use much at all (Garden Green and Lavender Lace)! But that is why these challenges are so good...they get me using colors I don't regularly use! How about you go give it a try?

So here is what I came up with, a cute animal birthday card! I saw these colors and thought ummm...what are all those colors going to be on one card and I said the animals from Fox and Friend stamp set! So I made a simple card with the animals that coordinated with each color of the challenge. I tied a piece of White Satin ribbon around the fourth box.

I put each of the animal boxes on dimentionals and then mounted it to the Pumpkin pie card stock. In this close up picture, you can see that I made a score line border around the animal boxes to add a little more detail. The sentiment is from the retired stamp set Hugs and Wishes and was stamped in Pumpkin Pie.

Thanks for looking!