Showing posts with label 3D. Show all posts

Saturday, December 15, 2012

A Box and an Ornament- SCIC61- Mid Month

It's mid month, and that means there is still time to join us over at the Stampin' Celebration site for this months inspiration challenge!  And I have a little mid-monthsperation for you!  Here is what I made:

A box made out of one sheet of 12x12 card stock!  And....


 And ornament to go inside of it!


I used the Naturals Composition Specialty DSP to make the box and gave it a clear lid so you could peek at the glittery rosette style ornament that is inside.  I used Sahara Sand card stock for the ornament and added some Champagne Glass glitter, a large button and some linen thread to finish it off.

Here is a peek at our inspiration pictures for December:


We would love it if you played along with us!  I look forward to seeing what you were inspired to make by using December's Inspiration pictures!  Be sure to link it up to the main Stampin' Celebration site here by December 25 to be in the running to be our "Pick of the Party"!


Thanks for stopping by!


Friday, September 28, 2012

Hybrid Hand Print Tree- MDS Blog Hop

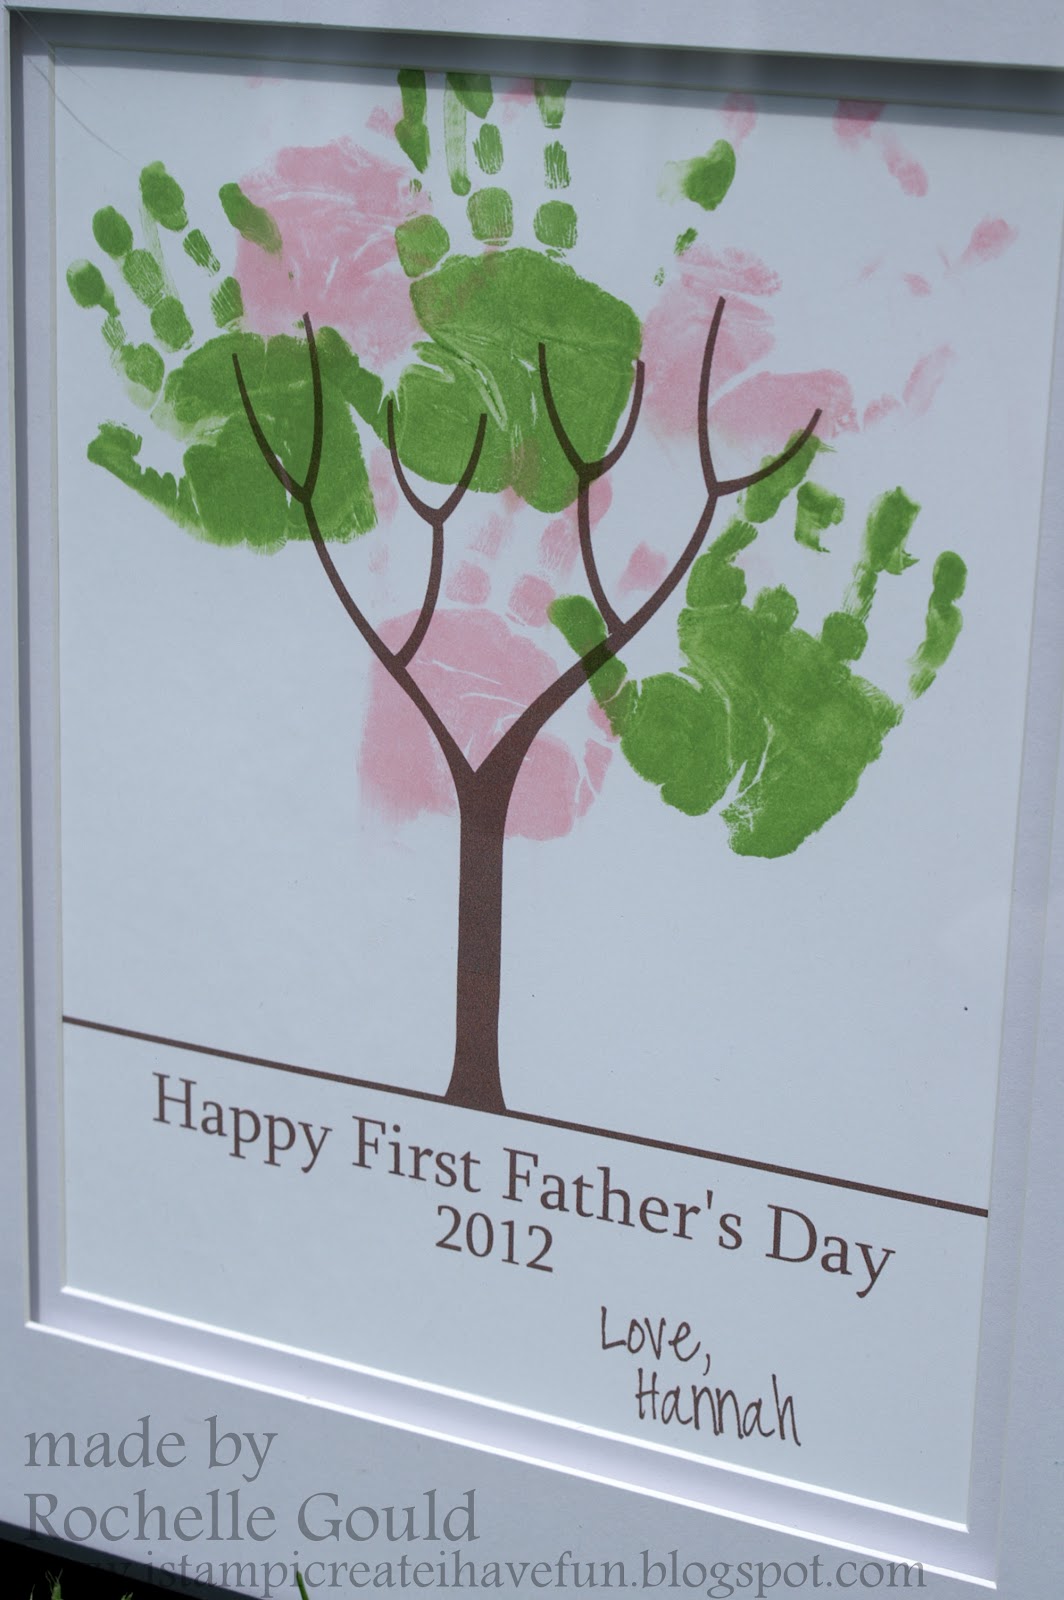
Welcome to the MDS Blog Hop! This week we supposed to copy a favorite layout from Pinterest.  Mine isn't exactly a layout, but I did copy it from Pinterest.  

Here is my project:


I saw this pin when I was looking for ideas on what to give my husband for his first fathers day and knew I could recreate it in MDS, so I did!  I used the trunk from the Sweetly Nested Framable Art kit, added by text and printed it out onto a piece of 8 1/2" x 11" Whisper White cardctock.  Then came the messy part...the hand prints!  I used my then 5 month old daughters hands and SU!'s classic ink.

(**Advise...print out a few copies of the trunk so when you are doing the hand print and your kid's hand decides it wants to slide across the page when you don't want it to, you will have another fresh trunk ready to go!  I also taped the cardstock to the counter top and put my daughter in the BabyBjorn so I could have both of my hands free to guide her hands where I wanted them to go).


Here is a close up of the tree inside the frame.  I didn't have to spend any new money on anything for this project and I think it is a gift that we will treasure forever! I really like the way this hybrid project came out.  I think my husband liked it too!


Are you ready to hop on over to the next blog? The easiest way to do so is to click on the name right below mine, so that would be Mandy and then from her blog hop on over to Julie's blog and so on until you have hopped a full circle back to here!


Saturday, August 6, 2011

Non-Winning Artisan Award- Raspberry Branches Message Board

Here is my second 3d project I submitted for Artisan Award. This one took a lot of time! It is a cork board/magnetic board all in one! (click on it to see it bigger!)

I made the cork and magnetic checker board using Stampin' Up's cork and magnetic sheets. If you look closely you can see that I stamped the magnetic sheets using Black StazOn and the raspberry image from the Clearly for You stamp set. I also made thumb tacks using cork sheets, a big shot die (to get the circle shape from cork) and also stamped them using Black StazOn and the butterfly image from the same stamp set.

You can also see in this picture that I edged the checker board with a "rope" I made using some thin gauge electrical wire wrapped in Early Espresso Taffeta ribbon. There are also hooks at the bottom with a custom SU! key attached....you can't see the key...oops, it got chopped off!

And here is a close up picture of the raspberry branches (that is what I called them at least!) that took the majority of the time to make! I made the branches using the same wire and taffeta ribbon as the "rope" and then added some leafs. Then I made the raspberries using about a million (maybe not quite) of the Cherry Cobbler punched four petaled flowers from the mini punch pack. They were attached to half of a mini craft foam ball. Everything that was paper on this project was sponged using the appropriate inks.

I seriously had fun making this project and making my own raspberry branches!

Thanks for looking!
if you were at convention you may have seen this on the display...it was there!

Thursday, July 28, 2011

Non-Winning Artisan Award- Sew Mini Products 3D entry

Here is one of the two 3d items I made for the Artisan Award contest. It is a wooden thread spool holder that was altered to make a cute display of some of the sewing themed products that were in the Occasions Mini catalog. (Click on the picture to see it bigger aka more detail!)

I had a BLAST putting this project together with all the little details and elements. I used fabric, buttons, pom-pom trim, linen thread, designer series paper, designer fabric brads, stamps, ink and a few non SU! items (the wooden thread spool holder, the mini clay pots, the wooden spools in different sizes, the bobbins and the mini straight pins) oh and don't forget the millions :) of mini glue dots used to hold everything in place so it will never move!

Here is a close up of one of the mini clay pots filled with tiny rolls of the Sweet Stitches fabric pined together using the mini straight pins.

Here is another close up picture of another mini clay pot. This one acts as a pin cushion adorned with a matching brad on top as well as linen thread for details. You can kind of see it on this pot if look very closely...I stamped all the clay pots with images from the Sew Suite stamp set (retired now) in crumb cake classic ink to give them a little more interest and aged look. In this picture you can also see a bobbin that is wrapped with linen thread.

In this close up picture you can see some more fabric wrapped up in mini bolts tired up with the hemp twine. You can also see the pom-pom trim wrapped around a spool and that I stamped the tops of all of the spools using the Button, Button stamp set.

You can also see the designer series paper that lines all of the "shelves" that the pots, spools and bobbins are sitting on.

What a fun little project to make! I love it!

Thanks for looking!
if you were at convention you may have seen this on the display...it was there!

Tuesday, May 3, 2011

Summer Fun Tracker & Blog Candy!!!

I have got some exciting news for you!! I have blog candy!!! and I was asked by Connie and Mary of Create with Connie and Mary to return as a Senior Guest Designer for their Summer Mini edition and....I said yes!

So you know what that means, it is time for another round of fabulous Stampin' Up! only projects with full blown tutorials (with pictures :) ) to go with them for a full five weeks! That 30 projects and not even mentioning the scrapbook project sheets you get too! All you need to do is subscribe today! Now is the perfect time to do so you will save $5 off the "normal" price! Check out the options here!

Over the next two weeks each member of the design team has a FREE special project (tutorial included) to share with you. This will give you an idea of the type of projects and how we present the tutorials to our subscribers.

Alright onto my project. It is a Summer Fun Tracker! (Really you could name this anything you wanted for whatever you are going to use it for...coupons, recipes......)

I took a Clear Stamp Case from Stampin' Up! and made it into a handy organizer to take with you on the go to keep track of anything you want to!


Here is the inside folders. Wouldn't this be a fun and bright way to organize things for you this summer? I think so! If you think so too, you need to check out the Create with Connie and Mary site for the FREE tutorial I made for you!

Are you ready for the blog candy? All you need to do is leave a comment on this blog post right here and you will be entered into the drawing for a FREE subscription to the Summer Edition!!! How awesome is that? Good Luck!

Thanks for looking!
and I hope to see you over at the Summer Edition soon!

Friday, April 8, 2011

Onesies for Trace- SCIC47

Yesterday was Thursday and that means time for another Stampin' Celebration Inspiration Challenge! This week we are celebrating cute little animals, strips and polka-dots! We hope you are inspired to make something and share it with us over at the Stampin' Celebration blog!

This week's inspiration pictures were perfect for me as I needed to make a welcome baby gift for a friend that had a baby boy recently!

Here is what I came up with a bag with a few personalized onesies for him to wear all tired up with a cute giraffe tag! I had so much fun making the tag and the onesies!

Here is a picture of the onesies I made. The first one has his name that I die cut using the Big Shot and the iron on adhesive and then just ironed it on the back of the onesie. The second one I made a tie
(figured it was appropriate since he is the only boy with two older sisters!) on the front of the onesie. I made the tie by using a template I drew my hand and then again used the iron on adhesive to attach it to the onesie.

Here is a close up of the So Saffron punch art giraffe I made for the tag. I used various Stampin' Up! punches to make him
(Hint...the head is the Owl Punch!). I made a tree for him to nibble on using the two step bird punch and a few hearts in Pear Pizzazz and then mounted it all onto a piece of Baja Breeze card stock that I sponged clouds onto.

I really had a great time making this entire project and I hope Mom and the new baby enjoy it!

Thanks for looking!

Click here to order Stampin' Up! supplies 24/7!

Saturday, February 26, 2011

Fringed Sewing Machine Cover (plus a tutorial)- ccmc-om5

We had a fantastic last week of projects and tutorials over at the Create with Connie and Mary Occasions Mini Edition! I can't believe it is over! It went by so quickly. This week we have been creating using all the products in the Oh Sew Suite from the Occasions Mini.

Ok, on to this week's Saturday challenge which was to Sew (real or faux)! Usually Saturday challenges are for our subscribers to join in and every time they do they are entered to win a $75 Stampin' Up! merchandise gift certificate and a FREE registration to Create with Connie and Mary Summer Mini Edition, but this week, since it is our last week it is only for the Design Team.

My sewing machine needed a new cover so bad I could hear it begging me to use the Sweet Stitches designer Series fabric to make a new cover for it this week, sew (so) that is what I did!


I used one pack of Sweet Stitches designer series fabric to make the entire cover. I added the "SEW..." to the front of the cover using the Fabric Adhesive Roll and some dark brown fabric that was die cut using the Serif Essentials bigz dies.

I am not going to go into a lot of details on how I made this here, because I have made a short two page pdf "how to" for you to download! Here it is: Fringed Sewing Machine Cover How To!

Be sure to head over to the Create with Connie and Mary site to check out the other Design Team Members sewing projects this week! While you are there make sure you check out their blogs as well!

Thanks for looking!

Click here to order Stampin' Up! supplies 24/7! remember for every $50 you spend you get to choose a FREE Sale-A-Bration product from the SAB catalog!

Monday, February 14, 2011

Box O' Love- Happy Valentines Day

We have club tonight so I thought this was an appropriate treat to give them this month! You will have to trust me on what is on the inside (I forgot to take a picture..eek!) I stacked two heart shaped chocolates and tied them together with a piece of the 5/8" Very Vanilla Satin Ribbon.

These little boxes were so fun and easy to make. I got the idea from Carrie here.

I hope you all are having a fabulous day!

Recipe:
Stamps: Teeny Tiny Wishes
Paper: Textured Cherry Cobbler, Very Vanilla, Pink Pirouette
Ink: Basic Black, Pi
nk Pirouette
Accessories: 5/8" Very Vanilla Satin Ribbon, Scalloped Heart of Hearts embosslit, Big Shot, Movers and Shappers Heart die, Small Heart punch.


Thanks for looking!


Click here to order Stampin' Up! supplies 24/7! remember for every $50 you spend you get to choose a FREE Sale-A-Bration product from the SAB catalog!

Saturday, February 12, 2011

Monogrammed Springtime Journal- ccmc-om3

We had another great week full of awesome projects and tutorials over at the Create with Connie and Mary Occasions Mini Edition! We have been creating using all the products in the Springtime Vintage Suite from the Occasions Mini this week! Do you want to see these projects? Do you want easy to follow tutorials to make these projects? I bet you do! It is never to late to join the Create with Connie and Mary Occasions Mini Edition and trust me....you will not regret it! Click here to find out how to subscribe and get in on all the fun!

Ok, on to this week's Saturday challenge which is a color challenge using Rose Red, Baja Breeze, Pear Pizazz and Very Vanilla. Saturday Challenges are for our subscribers to join in and every time they do they are entered to win a $75 Stampin' Up! merchandise gift certificate and a FREE registration to Create with Connie and Mary Summer Mini Edition!

Here is what I made, a monogrammed journal. This was fun and simple to make yet it makes a bold statement.

I used an Art Journal from Stampin' Up! as the journal. To create the background I used Very Vanilla card stock and the Dotted Scallop ribbon border, Scallop Trim border, Scallop Edge border and the Eyelet border punches and just layered them horizontally on the journal.

I made the flowers using scraps of the Springtime Vintage fabric glued to a circle of sticky sheet in a circular pattern starting in the center.

I added a few basic pearls to the center of the flowers as well as some Pear Pizazz card stock leaves made using the Build a Blossom punch.

The "R" was die cut from Rose Red card stock using the Big Shot and the Serif Essentials die. I used the Baby Blossoms stamp set to stamp a small leaf print onto the "R" using Rose Red ink and then mounted it to the journal using dimensionals.

Be sure to head over to the Create with Connie and Mary site to check out the other Design Team Members cards using these colors as inspiration. While you are there make sure you check out their blogs as well!

Thanks for looking!

Click here to order Stampin' Up! supplies 24/7! remember for every $50 you spend you get to choose a FREE Sale-A-Bration product from the SAB catalog!

Thursday, February 10, 2011

Love Oreo- SCIC#39

It's Thursday and that means it's time for another Stampin' Celebration Inspiration Challenge!

Check out these fun inspiration pictures! This week we are all about the pinks, reds and all those yummy treats!

Here is what I made! A love Oreo made of felt! I saw this made by Melanie, a fellow demo, and thought it was the cutest little thing and just had to make one and what better time than for this week's Stmapin' Celebration Inspiration Challenge!

I used the Movers and Shapers Heart die to die cut the felt and used the Fabric Adhesive Roll and an iron to stick all the layers together....worked like a charm!

I made the flower on top using a small piece of Pretty in Pink 1/4" grosgrain ribbon, a Red Glimmer Brad and a small piece of Certainly Celery Satin ribbon.

The love Oreo has a loop of 1/8" piece of Whisper White Taffeta ribbon attached to it so it can hang as a decoration on a tree or wreath or......oh the possibilities are endless! Can you image a tree full of these cute little treats?

Thanks for looking!
we would love to see your creation over at the Stampin' Celebration blog!

Click here to order Stampin' Up! supplies 24/7! remember for every $50 you spend you get to choose a FREE Sale-A-Bration product from the SAB catalog!

Saturday, January 29, 2011

Dressed-up Paper Bag Favor- CCMC-OM1

Wow has it been an AMAZING week one over at the Create with Connie and Mary Occasions Mini Edition! We have been creating using all the "Bring on the Cake Suite" things from the mini and let me tell you...there have been some SUPER cute and some one of a kind projects made using these products! Do I have you interested yet? Do you want to see what I am talking about? I bet you do! It is never to late to join the Create with Connie and Mary Occasions Mini Edition. Click here to find out how to subscribe and get in on all the fun!

It is time for the Create with Connie and Mary Occasions Mini Edition Saturday Challenge...week one we are making party favors using the "Bring on the Cake Suite" products! What perfect products to make a party favor!

Here is what I made, a dressed-up paper bag party favor! I started with a plain old paper bag (you can use any size you want) and stamped the number image from the Bring on the Cake stamp set. Then I measured the circumference around the bottom of the bag and then cut the Cherry Cobble card stock to that size and then cut slits in it to give it some interest. I then adhered it to the bag using sticky strip.

I used a few little strips of acetate to mount a few small paper stars to the bag so it looks like they are flying up behind the cupcake.

The cupcake was made using the new Create a Cupcake punch from the Occasions Mini Catalog using Daffodil Delight and Basic Black card stock and was mounted onto a 1 3/4" circle Naturals White card stock using dimensionals.

Change the color scheme and you would have a super cute party favor for a girl's birthday, or baby shower or wedding! So many options for this cute little favor!

The Saturday challenges are for our subscribers to play along with us! When they enter the challenges, they have their name put in the drawing for one of two $75 merchandise certificates and one of two FREE subscriptions to Create with Connie and Mary SUMMER Editon. The more they enter the challenges, the more times their name is entered into the drawing! You can subscribe here!

Be sure to head over to the Create with Connie and Mary site to check out the other Design Team Members party favors and their blogs as well!

Oh....I also heard there is a FREE tutorial for one of the projects over on their blog as well as a bonus this week!!


Thanks for looking!
and I hope to see you over on the Create with Connie and Mary site soon!

Monday, January 17, 2011

Love You Frame

This frame features some of the Love Impressions Rub-Ons from the new Occasions Mini. I do not use rub-ons very often, but I really did love using them on this project!

I used a picture of my sister and her husband on their wedding day and added a few rub-ons and a fun multi-layered picture frame. It is hard to see the layers here, but you can see them in real life way better! (click on the picture to make it bigger.)

Do you want to see some cute projects and get FREE tutorials using the valentine's day themed products from the new mini? If so you NEED to check out the Create with Connie and Mary blog soon...the preview period is going on now for the upcoming Occasions Mini Edition!

During the Preview period we will be offering a special subscription rate of $24.95 for 5 weeks of daily ideas using the stamps and products in the Occasions and Sale-A-Bration Mini Catalogs! This is $5 off the regular 5 week price of $29.95. Early Bird Pricing ends Saturday, January 22nd at 11 pm EST! So DON'T DELAY!

What do you get for your subscription fee? You get a new project EVERY DAY Sunday through Friday (with at LEAST TWO FULL TUTORIALS EACH WEEK) and a fun challenge on Saturday to join (and have the opportunity to win prizes at the end of the 5 weeks). For those projects not having a full tutorial, we provide you with an easy to download and print project sheet! WHAT A DEAL!

Thanks for looking!

Tuesday, January 11, 2011

Love U Candy Bar Case & BLOG CANDY!

Wooohooo! If you don't know, I was invited back to be a guest designer for the Create with Connie and Mary Occasions Mini Edition! We are celebrating two preview weeks before the 5 week private subscription begins on January 23! We will be featuring the stamps and accessories from the Occasions Mini throughout the entire subscription period. For the preview weeks we are featuring the "valentines day-ish" products from the mini and all 5 design team members are creating projects that will be like the projects you will get if you subscribe to the Occasions Mini Edition! You will want to visit the Create with Connie and Mary blog to make sure you do not miss a thing in the next few weeks!

The Early Bird Special Price of $24.95 US is a savings of $5 and is good only until January 23 at 11:55pm...then the regular price price of $29.95 returns. You can see payment options here.

Ok, so on to my preview project!

As you can see I used Clear-Mount Stamp Case is a fun new way! This would be a great gift for Valentines Day which is approaching fast, because no matter who you give this gift to, you will get a gift for yourself too! :)

If you would like a FREE tutorial for this project including pictures click on over to the Create with Connie and Mary blog to get it!


Alright, on to the BLOG CANDY! We are giving away 6 FREE subscriptions to the Occasions Edition and a way of getting one of those is to leave a comment on my blog post today! Be sure to check out the Create with Connie and Mary blog to find out where else you can get a chance for a FREE subscription as well!


Winners will be announced on Sunday, January 23 at 12 noon (EST). To find out if you are a WINNER…you need to check the Create with Connie and Mary site no later than Saturday, February 5 at 12 noon (EST) and send us your email address at createwithconnieandmary@gmail.com.


Thanks for looking and Good Luck!

Tuesday, December 14, 2010

"Muffin Tin" Advent Calendars

I was a vendor at a Holiday craft fair a few weeks ago and made a few "muffin tin" advent calendars and here they are! I had a blast making them.

(Click on the pictures to see a close up picture of them.)


FYI, a "muffin tin' advent calender is made using a 24 cup muffin tin that you decorate each of the muffin cups with using a magnetic circle (and all sorts of fun embellishments), so that the cup can hold a special treat!

Thanks for looking!

Thursday, December 9, 2010

Dazzling Snowman Ornament- SCIC31


It's Thursday and that means time for another Stampin' Celebration Challenge! This week we have some non-traditional Christmas colors to work with. I saw the inspiration pictures and knew whatever I made was going to have pink on it and be sparkly!

Here is what I made, a snowman ornament! I used a few glass ball ornaments and added dazzling diamonds to them and then hot glued them together in a snowman shape. I added a few big buttons from the Holiday mini catalog, a handmade scarf (I sewed a few pieces of ribbon together) and made a top hat for him (or her) and it was done!

The snowman is going to glimmer very nicely when the dazzling diamonds catch the light off the Christmas tree!

Thanks for looking!
and I hope I inspired you to create something!

Saturday, November 20, 2010

Pretty Packaging- CCMC-HM8

It's week 8 over at the Create with Connie and Mary Holiday Edition and that means that last week :( and that means this is the last Saturday Challenge for me too. I have really enjoyed my time as a Guest Designer for their Holiday Edition. Thanks to Connie and Mary for asking me to be apart of their Design Team. If you have not checked out their blog, do so now!

This week we have been creating using the Tags will Christmas, Calendar Kit, Jolly Jingles, Designer Fabric and the level 2 hostess Peaceful Seasons stamp set and the Saturday Challenge is for the Design Team only this week is Pretty Packaging.

Here is what I made, my own wrapping paper using the Tags till Christmas stamp set! I stamped my images on Kraft Paper (you know the stuff that comes in a roll like wrapping paper but is not pretty until you make it that way!) and then tied it up using some raffia and added a stamped tag to to package.

I used Cherry Cobbler, Old Olive and Early Espresso ink to stamp on the Kraft paper with. I also sponged a little bit using Soft Suede ink. Making the paper really did not take that long, I was surprised how quickly it was done! Here is a picture so you can see the paper better.

Here is a close up of the tag I made for the top of the package. You can also see that I sponged the edges of the package using the Soft Suede ink. I think it gave it a vintage-y look.

Making your own wrapping paper is a very easy way to make you gift unique and impress the person who is receiving it before they even open it! Give it a try this holiday season!

Be sure to check out the other design team members "pretty packages" this week too:

Connie Babbert- Inkspired Treasures
Cristena Bagne- Gettin' Crafty
Jenn Picard- A New Ink on Life
Mary Brown- StamperCamper's Corner

Thanks for looking!

Thursday, October 21, 2010

Towering Trio of Sweet Treats- SCIC25

It's Thursday and that means it is time for another Stampin' Celebration Inspiration Challenge! This week we are celebrating spiders, pumpkins, bats, cats and plenty of bright fun colors! And I saw an awfully lot of sweet treats in the inspiration pictures too!

Here is what I came up with, a Towering Trio of Sweet Treats! I used Certainly Celery, Perfect Plum, Pumpkin Pie and Basic Black as my color scheme.

I die cut the boxes from the Bitty Box and Envelope die with my Big Shot and then used the Batty for You stamp set to stamp the images using the same color ink as the card stock. Then I filled the boxes with some sweet treats for a special trick-or-treat-er!

I stacked them all together and tied them up using the Basic Black 1/8" Taffeta Ribbon. I added a simple tag to the top by using the Batty for you stamp set, Basic Black ink and the 1 1/4" and 1 3/8" circle punches.

A simple yet fun project to make treats extra cute for extra cute trick-or-treat-ers!

Be sure to check out the other design team members projects this week too over at the Stampin' Celebrations blog and I hope I inspired you to join us this week!

Thanks for looking!

Saturday, October 16, 2010

So Sweet Candle- CCMC-HM3

It's Week 3 over at the Create with Connie and Mary Holiday Edition! This week we have been been "building" the Design-a-House's from the Holiday Mini and they are SOO much fun to design, create and build! I wish I could show you mine, but I can't here, so if you want to see it then you will have to be a subscriber to the Create with Connie and Mary Holiday Edition.

Since we are "building" houses this week our Saturday Challenge was to make a small hostess gift. Here is what I came up with, a So Sweet Candle!

I took a cheap white candle (about 3 inches in diameter and height) and gave it a cute belly band decorated with gumdrops and peppermint candies that I made! The actual belly band are "Graham Crackers" that I made from paper. (hint hint...if you like this, you will LOVE my house...what are you waiting for...go subscribe!) The tag was made by punching out Crumb Cake card stock using the Decorative Label punch and then adhering the "So Sweet" sentiment that I die cut using the Timeless Type Junior Alphabet and my Big Shot.

Here is a closeup of the candies. I used the Large Oval punch to get the Gumdrop shapes which I punched out of the colored card stock that I embossed using a sparkly mix of clear embossing powder and Dazzling Diamonds. I put the candies on the Graham Cracker using dimensionals.

Be sue to check out the other Design Team members small hostess gift this week to:

Connie Babbert- Inkspired Treasures
Cristena Bagne- Gettin' Crafty
Jenn Picard- A New Ink on Life
Mary Brown- StamperCamper's Corner

Thanks for looking!

Do you want to be entered into a drawing for one of two $75 Stampin' Up! merchandise gift certificates or two FREE passes to the NEXT edition of Create with Connie and Mary? If so, then head over to the to the Holiday Edition and play along with us in the Saturday Challenges! (You must be a subscriber to play in the Saturday Challenges.)

Thursday, August 26, 2010

Reagan's 6th Brithday Cupcake Pin- SCIC17

Stampin' Celebration has another fun Inspiration challenge this week! The inspiration photos are very girl birthday-ish in my mind! I would love to see what your take would be on this weeks inspiration photos...so go create something and share it with us on the Stampin' Celebration blog! Oh and while you are there take a look at the other design team members creations this week too!

Here is what I came up with! It is a card and a special birthday girl pin all in one! The card measures 4 1/4" x 4 1/4" and the colors I used were Whisper White, Pretty in Pink, Melon Mambo and of course some sparkle! The "swirls" on the card base were stamped in Pretty in Pink on to the Whisper White card stock using the Priceless Stamp set.

I die cut the cupcake using the Big Bold Cupcakes Sizzlits die a few times with the appropriate color card stocks and then glued the layers together to make the cupcake a little stiffer and sturdier, since it is going to a 6 year old! :) I embossed the "frosting" with a clear and dazzling diamonds embossing powder mix to give it a little sparkle and interest. The 6 on top was die cut using the Big Shot and the Timeless Type Junior Alphabet and embossed with clear embossing powder.

I added a Melon Mambo bow around the base of the cupcake and a pin to the back, so she can wear it ALL day, and the pin was done! Here is a picture of just the cupcake.

Here is what the card looks like when it is open. You can see that the cupcake pin comes off the card base easily.

Thanks for looking!
and I hope to see you over at the Stampin' Celebration blog soon!

Wednesday, August 11, 2010

Embellished Chunky Mirror- Artisan Award Submissions 2010


Here is another one of my 3D items I made for Stampin' Up!'s Artisan Award. I really loved this one!! It is the 12x12 Chunky Frame embellished to be a mirror!

It uses the Chunky Frame, Wood Sheets, Stencils, embossing, paper, ribbon, Pretties Kit (now retired), Big Shot dies and a Simply Adored Charm all from SU!.

I "stained" the wood sheets using a few classic ink re-inkers and water as my stain and a sponge as my brush.

I used the stencil as a template to emboss the frame to give it a pattern, more interest and dimension.

I made a few paper flowers using the scalloped circle die and the sewing machine to accent two of the corners of the frame. I also added a few half pearls to the flowers from the Pretties Kit.

The Simply Adored Charm hangs off a small Chocolate Chip Satin bow and a pin from the Pretties Kit.


Thanks for looking!