Showing posts with label Wedding/Love. Show all posts

Thursday, August 11, 2011

Non-Winning Artisan Award- Vintage Love Page


Here is the last scrapbook page I made for the Artisan Award this year. It features my parents on their wedding day.

(Click on the page to see it bigger!)

This page has a vintage feel to it which was fun to create because the more distressing (tearing, ripping, sponging) the better!

In this close up you can see some of the distressing and laying I did on the page. If you look close you can see a few of the pearls on the corner of the picture.

I used the Love Letter (retired...boohoo) DSP as well as some Early Espresso card stock, satin and lace ribbon, pearls, vintage trinkets (mini safety pin), the Take a Seat stamp set, the Big Shot and the Timeless Type alphabet dies.

Here is another close up of some of the details on the page.

It is always so fun to create "real" scrapbook pages, even though I don't do it enough.

So this is the last project for Artisan Award for this year! I hope you have enjoyed them all!

Thanks for looking!
if you were at convention you may have seen this on the display boards...it was there!

Thursday, March 24, 2011

Detailed Cupcake Tops- SCIC45

It's Thursday and that means it is time for another Stampin' Celebration Inspiration challenge! This week we are going black and white.

When I saw the inspiration pictures this week the detail decorated cupcake tops caught my eye and so decided to create my card based on those.

Here is what I came up with! I had a lot of fun decorating my mini 1 1/4" circle "cupcake" tops! I decided to go with the wedding theme because black and white together are elegant to me and this card just said wedding.

I used Basic Black and Very Vanilla card stocks on my card. I made the Very Vanilla flowers using taffeta ribbon and a heat tool. (You can see a great tutorial that Kelly put together on how to make the flowers here.) I also added a few basic pearls to the "cupcake" tops.

Here are the inspiration pictures for this week. Do you feel inspired? I hope so! We would love to see your creations over at the Stampin' Celebration blog...you never know, you may be our next "Party Guest" designer!

Thanks for looking!

Click here to order Stampin' Up! supplies 24/7! remember for every $50 you spend you get to choose a FREE Sale-A-Bration product from the SAB catalog! Only ONE week remaining in this amazing promotion!!

Tuesday, March 15, 2011

60 Years of Marriage- cqc#76

It's Tuesday and that means the colourQ has some new colors to be inspired by! It's also time for another digital scrapbook page! I look forward to making these pages every week! I love using My Digital Studio!

(click on the page to see it bigger!)

I knew I was going to scrapbook a picture of my Grandma and Grandpa because they are celebrating their 60th wedding anniversary this week, but I didn't realize how hard it was going to be to use these colors for it!

I finally decided that clean and simple and to the point was the way my scrapbook page needed to head, so that is what I made. I do think it turned out well and I did manage to use all the colors!

I hope you have time to join us over at the colourQ blog this week! We would love to see your projects using these colors!

Thanks for looking!

Click here to order Stampin' Up! supplies 24/7! remember for every $50 you spend you get to choose a FREE Sale-A-Bration product from the SAB catalog!

Tuesday, February 15, 2011

Lots of Love...-cQc#72

It's time for another digital scrapbook page...yippe!! This week Arielle over at the colourQ had some challenging colors for me to use for a scrapbook page, but I guess that is why it is called a "challenge" right?? (click on the picture to view it larger)

The colors for this week are Cherry Cobbler, Not Quite Navy, Baja Breeze, Tangerine Tango (challenging color for me!!) White and Crumb Cake/Kraft.

I knew this week I wanted to use a picture of my husband and I, this week will be our 4th wedding anniversary :), but didn't realize how hard it would be to find a picture of us that went with these colors! I had to dig deep and found this picture of us in 2006...before we were even married!

I was having a hard time finding anything Tangerine Tango to use, besides normal card stock, until I found Tangerine Tango in the Stitches DSP from the Sew Sweet paper pack in My Digital Studio and cropped all the other colored stitches out and just used the Tangerine Tango ones!

I do like the way this page finally came out! (you do not want to know how many layouts and element changes I went through to get my final page...)


Thanks for looking!
I hope to see your creation over at the colourQ blog this week too!


Click here to order Stampin' Up! supplies 24/7! remember for every $50 you spend you get to choose a FREE Sale-A-Bration product from the SAB catalog!

Monday, February 14, 2011

Box O' Love- Happy Valentines Day

We have club tonight so I thought this was an appropriate treat to give them this month! You will have to trust me on what is on the inside (I forgot to take a picture..eek!) I stacked two heart shaped chocolates and tied them together with a piece of the 5/8" Very Vanilla Satin Ribbon.

These little boxes were so fun and easy to make. I got the idea from Carrie here.

I hope you all are having a fabulous day!

Recipe:
Stamps: Teeny Tiny Wishes
Paper: Textured Cherry Cobbler, Very Vanilla, Pink Pirouette
Ink: Basic Black, Pi
nk Pirouette
Accessories: 5/8" Very Vanilla Satin Ribbon, Scalloped Heart of Hearts embosslit, Big Shot, Movers and Shappers Heart die, Small Heart punch.


Thanks for looking!


Click here to order Stampin' Up! supplies 24/7! remember for every $50 you spend you get to choose a FREE Sale-A-Bration product from the SAB catalog!

Friday, February 11, 2011

Simply in Pink - cQc#71

This week's colourQ color challenge is so pretty I just had to make a card using the colors!

I was thinking the other day I haven't even used the cute little love kid in the Greeting Card Kids stamp set yet, so I pulled out the colors and the stamp set and here is what I came up with!


I just love coloring these little Greeting Card Kids on Stampin' Up's watercoor paper using my blender pens and the different classic ink colors that I need!

Very simple, but super cute I think!


Recipie:
Stamps: Greeting Card Kids, Teeny Tiny Wishes.
Paper: Crumb Cake card stock and water color paper.
Ink: Black StazOn, Pretty in Pink, Blushing Bride, Pink Pirouette, Crumb Cake.
Accessories: Very Vanilla Seam binding ribbon, blender pens, corner rounder punch.


Thanks for looking!

Click here to order Stampin' Up! supplies 24/7! remember for every $50 you spend you get to choose a FREE Sale-A-Bration product from the SAB catalog!

Thursday, February 10, 2011

Love Oreo- SCIC#39

It's Thursday and that means it's time for another Stampin' Celebration Inspiration Challenge!

Check out these fun inspiration pictures! This week we are all about the pinks, reds and all those yummy treats!

Here is what I made! A love Oreo made of felt! I saw this made by Melanie, a fellow demo, and thought it was the cutest little thing and just had to make one and what better time than for this week's Stmapin' Celebration Inspiration Challenge!

I used the Movers and Shapers Heart die to die cut the felt and used the Fabric Adhesive Roll and an iron to stick all the layers together....worked like a charm!

I made the flower on top using a small piece of Pretty in Pink 1/4" grosgrain ribbon, a Red Glimmer Brad and a small piece of Certainly Celery Satin ribbon.

The love Oreo has a loop of 1/8" piece of Whisper White Taffeta ribbon attached to it so it can hang as a decoration on a tree or wreath or......oh the possibilities are endless! Can you image a tree full of these cute little treats?

Thanks for looking!
we would love to see your creation over at the Stampin' Celebration blog!

Click here to order Stampin' Up! supplies 24/7! remember for every $50 you spend you get to choose a FREE Sale-A-Bration product from the SAB catalog!

Thursday, February 3, 2011

Simply Sophisticated Valentine- SCIC#38


It's Thursday and that means time for a Stampin' Celebration Inspiration Challenge! This week we are inspired by the bold red, black and white in these photos.

Feel inspired? We would love to see what you create using these photo's as inspiration by uploading your project to the Stampin' Celebration blog here!

Here is what I made, a simply sophisticated valentine! With the clean and simple lines this card has, it would be a perfect masculine card (even thought it has some of the new Red Glimmer paper on it!)

If you haven't had a chance to get your hands on any of that glimmer paper, you need to....it is awesome! It gives your project that glittery look and feel without actual glitter getting all over everything everywhere!

Recipe:

Stamps: Teeny Tiny Wishes
Paper: Very Vanilla, textured Basic Black, First Edition DSP and Red Glimmer paper
Accessories: Big Shot, Perfect Polka-Dots embossing folder, Full Heart extra large punch.


Thanks for looking!

Click here to order Stampin' Up! supplies 24/7! remember for every $50 you spend you get to choose a FREE Sale-A-Bration product from the SAB catalog!

Thursday, January 27, 2011

Simple Digital Love- SCIC37

It's Thursday and that means time for another Stampin' Celebration Inspiration Challenge! This week "love is in the air" over at the Stampin' Celebration blog! We would love to have you join us and would love to see your creation!

This week I created a postcard in My Digital Studio. I love that My Digital Studio is so easy to use and I can use it even when my craft desk is a mess and I don't want to clean it up (or make it even messier after creating a card!)!

I used the Love Impressions DSP as well as some Satin ribbon and the scalloped edge punch. I also added a Sending Love epoxy brad to add a little bling.

If you haven't checked out the new downloads for My Digital Studio in a while, you need to! Stampin' Up! adds new downloads VERY often (like a few times a month) and they are AMAZING and cheap!!

I hope you will celebrate with us this week at the Stampin' Celebration blog!

Thanks for looking!

Thursday, December 30, 2010

Classy Love Bird- SCIC33


It's Thursday and that means time for another Stampin' Celebration Inspiration Challenge! This week we are celebrating New Years with red, black, white and sparkle! Feel free to join us and upload a card at the SCIC blog!
As you can see my card is not really new years-ish nor is it sparkly, but this card just came together and I liked it, so that is what you get! :)

I used the hostess level 1 stamp set called Punch Potpourri and the Extra Large Two Step Bird punch that goes coordinates with the stamp set. The colors I used were Cherry Cobbler, Basic Black and Whisper White.

Here is a close up of the details. You can see I layered two punched out birds together and popped the top layer and the wing up with dimensionals. The sentiment come from the stamp set Three Little Words and was cut apart and glued on.

Thanks for looking and Happy New Year!!

Friday, November 5, 2010

Field of Flowers- SCIC27


It is time for another Stampin' Celebration Inspiration Challenge! This week we are celebrating fall weddings! Feel free to join us this week by making a card or project inspired by our photos this week and upload it over at the Stampin' Celebration blog! We would love for you to join us!

Here is what I came up with! The colors I used were Very Vanilla, Bravo Burgundy, Pumpkin Pie, Certainly Celery, and Blushing Bride.

This card was really pretty easy to make. I took the Itty Bitty Shapes punch pack and used the flower shape and punched out the card stock colors I wanted and then crumpled them up and stuck them to a piece of card stock that was covered in the sticky pages. Then I took a few small pearls and put them in the middle of all the Certainly Celery flowers.
I textured the Very Vanilla background using my Big Shot. I finished off the card by added a Very Vanilla Satin ribbon and a greeting from the Tiny Tags stamp set and the Tag punch.

Thanks for looking!
I hope I inspired you to play with us this week!

Sunday, October 10, 2010

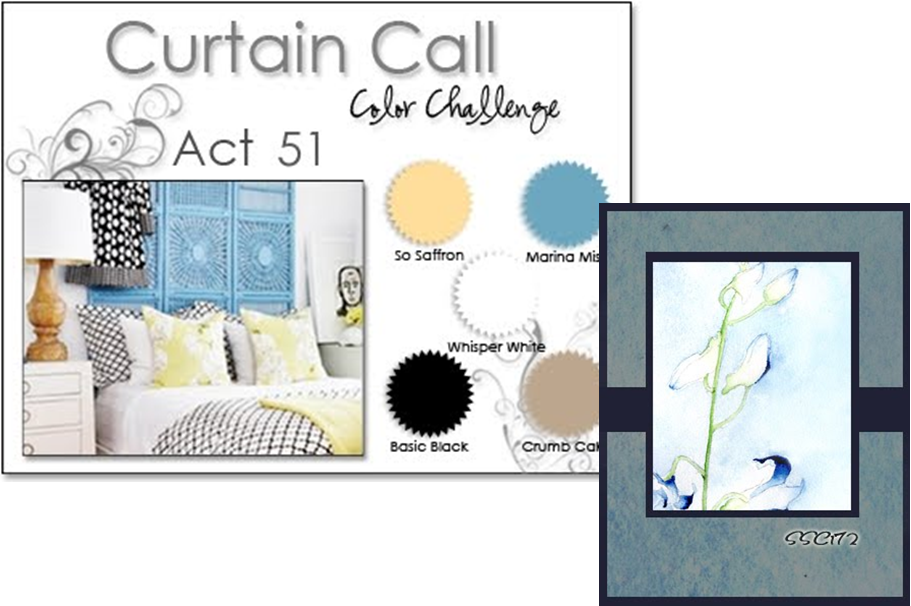
Old School Love You- CCCCact51, SSC172


When I saw Stacey's Curtain Call Color Challenge today, So Saffron, Marina Mist, Whisper White, Basic Black and Crumb Cake, I instantly wanted to play! Then when I was poking around blog world I found a challenge blog, new to me, called Stamping 411 and this week they have a simple sketch. So I decided to combine the two and make a card!

Here is what I came up with, Old School Love You. I LOVE water coloring and this stamp set, Greeting Card Kids, is perfect for it!

I stamped the girl using Black StazOn onto Water Color paper and then used my Blender pens and the appropriate colors to color her in. I hand cut the individual letters from the designer series paper pack Newsprint and arranged them on the Water Color paper.

I used the Cracked Glass Technique on the main image to give it more of an "Old School" look.

I added black Satin ribbon, a Crumb Cake button and a little Linen Thread to finish it off!

Thanks for looking!

Wednesday, July 14, 2010

Bride and Groom Owl in a Love Nest- CCCCact38

Stacey has some bright colors this week for the Curtain Call Color Challenge Act 38! They are Certainly Celery, Regal Rose, Very Vanilla, Pumpkin Pie and Rich Razzleberry. I needed to make make my sister and her future husband a wedding card and I knew it wasn't going to be a traditional wedding card, because they are not too traditional, so I thought these color may work, and they did!

Here is what I came up with, a bride and a groom owl sitting in their love nest. I had a lot of fun putting this card together that uses the new Two-Step Owl Extra-Large punch. The love nest is made using the Heart to Heart Extra-Large punch and Certainly Celery card stock that was sponged around the edges.

I punched out the owls using the appropriate card stocks for this weeks colors and sponged around the edges of all the pieces. Then I mis-matched the owls colors and put them together. I added a few of the new Pearls from Stampin' Up! to the bride owl's head and a little Vellum Veil. The groom owl got a Rich Razzleberry bow tie.

The Very Vanilla card base was sent through the Big Shot with the Vintage Wallpaper embossing folder to give it some texture and some "fancy wedding feel". The sentiments come from the stamp set Fundamental Phrases and are stamped in Rich Razzleberry.

Thanks for looking!
and
Congratulations Stacy and Nick!

Saturday, April 17, 2010

Simple Hearts- cQc#18


Arielle has some fun colors to work with this week! The colors for this week are are Ruby Red, Regal Rose, Pumpkin Pie, Bermuda Bay and Whisper White. Usually I do not use hearts on anything but Valentines day projects, but for some reason I felt like hearts are what I needed to use this week!


I pulled out a few heart punches and made this super simple quick card! I punched out the hearts from the colors of card stock for this weeks colors and adhered them to each other using a glue pen. I then embossed a piece of Whisper White card stock using the Perfect Dots embossing folder and my Big Shot
and glued it to the Whisper White card base. I tied a piece of 1/4" White Grosgrain ribbon around the card
and called it good!

I had fun with these colors and this is all I did! SO I will definitely be using these colors again in the future!


Thanks for looking!

Sunday, February 14, 2010

Love Puzzle


Happy Valentines Day!

The colors for this card came from one of Stacey's Curtain Call Color Challenges that I didn't upload in time for, but I though I would share anyways!

I used the Love You Much stamp set to stamp the hearts on Whisper White card stock and then colored them in using my Stampin' Write markers. I tied a simple bow around the card and added the "Love" from the Fundamental Phrases stamp set punched out using the Medium Tag punch in the Occasions Mini catalog.

Thanks for looking!

Thursday, February 11, 2010

Love Buttons- CCCCAct16

What great warm/home-y colors Stacey has this week for her Curtain Call Act 16! They are Real Red, Kraft and Very Vanilla. I needed to make a Valentine to send to a friend, so I used theses colors to come up with one.

Here is what I came up with! I had fun putting this card together. I die cut the big heart with my Big Shot and the Stampin' Up! Hearts and Bracket die using textured Real Red card stock. The small heart that is tied to the big heart using Linen Thread came from the Heart to Heart punch. I used the new Pinking Hearts Border punch on the Kraft card stock. I also sponged the Kraft and the Real Red card stocks to give them more texture.

The little banner was stamped with the "happy Valentines day" stamp from the Teeny Tiny Wishes Stamp set.


There are buttons from the Buttons #5 Sizzlits die making up a background on the Very Vanilla card base. Here is a close up picture of them. I thought this gave the card a little more detail, but was subtle enough to not distract away from the main heart image.


Thanks for looking!

Tuesday, January 26, 2010

Cute Heart Stealer


Look at this cute Valentines card! I saw mjw over at splitcoast did a card like this and I thought it was so cute, I had to give it a try!

I ran the Melon Mambo card stock through my Big Shot with the SU! Perfect Polka Dots impressions folder and put it on the Chocolate Chip card stock card base.

I stamped the cute images from the clear mount Love Bandit stamp set using Staz-On onto watercolor paper and then water colored them in using SU! markers and my Aqua painter pen. I mounted it onto a piece of Chocolate Chip card stock and then folded a piece of Chocolate Chip 5/8" grosgrain ribbon under it and mounted it to the card. Simple layout, but super cute stamp set!

Thanks for looking!

Thursday, October 1, 2009

Wedding Cherry Blossom Card Holder

Here is a wedding card/gift card holder I made for a wedding we went to about a month ago. In the picture you can see the invitation to the wedding and then the card/gift card holder I made to match to give them.

It took me a little while to figure out the right dimensions for all the layers and so the gift card would fit inside just right, but I got it all figured out and think it turned out good! I wrote our message for the bride and groom on the inside, added the gift card, put the belly band around the whole thing and called it good! (After I got done folding it and adding the gift card, it was heavy and thick, so I figured it would be ok with out an envelope.)

Thanks for looking!

Friday, September 18, 2009

Vanilla Wedding Cake- CAS32


This week over at Splitcoast the Clean and Simple (CAS) challenge was to make a wedding card. Here is what I came up with and I really like it! I don't think the picture does it justice at all! It was hard to get a good picture of the same colored detail.

I made the background for the card by sending a piece of Vellum Card stock though my Big Shot with the Damask texture plate. I then sewed it on to the card base using my sewing machine. I made the cake (I saw a cake like this on the boards at convention...but I don't know who made it!) by cutting pieces of Very Vanilla card stock and layering them to look like a cake and then added ribbon, flowers and brads to give it the finishing touch.

Here is a close up of the detail on the card.

Thanks for looking!

Tuesday, May 26, 2009

Twilight Love- Cinema Saturday Creative Challenge #32


Here is a new challenge for me, it is called Cinema Saturday Creative Challenge. I have been checking in on their blog for a little while now, and decided to take the plunge this week! Every Saturday they post a new movie and then you make a card inspired by that movie (you can find out more on their blog). What a fun idea!

This week the Movie was Twilight. I am not a Twilight freak like some people I know, most of my club, (I saw the movie and I have read maybe about 1/4 of the first book...) but I decided to do the challenge anyway and then give the card away at my next club!
So here is what I came up with, a simple card with the requirements from the challenge, use red, black and some sparkle. The two hearts are chipboard hearts I covered with card stock. The red one (Bella) is Ridding Hood Red and then the sparkly one (Edward) was embossed with a Dazzling Diamonds and Clear Embossing powder mix. The words (from a couple different sets) were stamped on Basic Black card stock and then embossed with White Embossing powder.

The card base is Basic Black and then it has a panel of Whisper White and then a sheet of Vellum card stock on top of that. I think the Vellum give it a softer and more mysterious look, which I think fits Twilight.

Here is a close up of the sparkly heart. I hope you like it, I had fun with this new challenge!

Thanks for looking!