Showing posts with label Club Cards. Show all posts

Tuesday, March 2, 2010

Chocolate Bird with Sweet Pea Accents


Here is a card that I made for my club to make last month for club. It uses a lot of new products that are in the Occasions Mini catalog.

I embossed a piece of Chocolate Chip card stock using my Big Shot and the Stampin' Up! Perfect Polka Dots embossing folder and put it on top pf the Chocolate Chip card base. I then clustered three circles that I had die cut using the Big Shot and the Sweet Pea DSP into the bottom right corner of the card.

Next I used the new Extra Large Two-Step Bird punch and punched out a Chocolate Chip bird and two Old Olive branches. I then placed a few pieces of the Sweet Pea Felt around the bird and then added a clear rhinestone brad to give the card a little bling. The sentiment "friends" is from the Tiny Tags stamp set and is stamped and then punched out using the Medium Jewlery Tag punch.

Here is a close up of the details.

Thanks for looking!

Sunday, December 20, 2009

Simple and Elegant Ornamet


Here is a simple but elegant Christmas card I made. The colors are Real Red, Chocolate Chip and Very Vanilla.

The ornament is from stamp set is Tree Trimmings and the sentiment is from Teeny Tiny Wishes which are both in the catalog. The texture on the card comes from the impressions folder Petals-A-Plenty which is in the Holiday Mini. If you want to get this folder, you only have a few weeks to get it as the Holiday Mini catalog ends January 4! I finished off the card by tying a piece of the 5/8" Grosgrain Chocolate Chip ribbon into a bow and put it on the card with glue dots.

Thanks for looking!

Friday, December 4, 2009

Glittery Glass Ornaments


Here is a fun project idea! Glittery Glass Ornaments! I just love how they come out (even better that the glitter is on the inside of the ornament and not on the outside, that way it is not messy and you don't have glitter on EVERYTHING else you own!) They are simple and quick and with great results! I found Denise's video tutorial and it is great, so click here to see it.

Just to give you an idea of what colors mine are I will tell you what I used.

The red one I used the Ridding Hood Red re-inker (retired) or any other red red would work too and then the Red Fine Galaxy Glitter.


The darker gold one (in the back) I used So Saffron re-inker and the Gold Fine Galaxy Glitter. The lighter gold one (in the front) I used Barley Banana re-inker and the Champagne Fine Galaxy Glitter.

The Green one uses Certainly Celery re-inker and the Silver Fine Galaxy Glitter.


You can use any color combination you want, try it out and you will see that the sky is the limit!


Thanks for looking!

Tuesday, December 1, 2009

Simple Snow Buddies


Here is a cute little card that we recently made at one of my stamp clubs. It uses the Hostess stamp set Snow Buddies in the Holiday Mini catalog.

This card measures 4 1/4" X 4 1/4". The card base is Night of Navy and the DSP is from the Pawsitively Prints paper pack in the Holiday Mini that is part of the Build a Bear collection.

The snowmen are sitting in a pile of ripped Whisper White card stock with a piece of White Satin ribbon tied around it.

You can see in this close up that we stamped one of the snowflakes in the Snow Buddies stamp set on the DSP using the Bashful Blue classic ink to give it a subtle look. The snowman's noses and scarves were colored using the Stampin' Write markers.

Thanks for looking!

Thursday, November 26, 2009

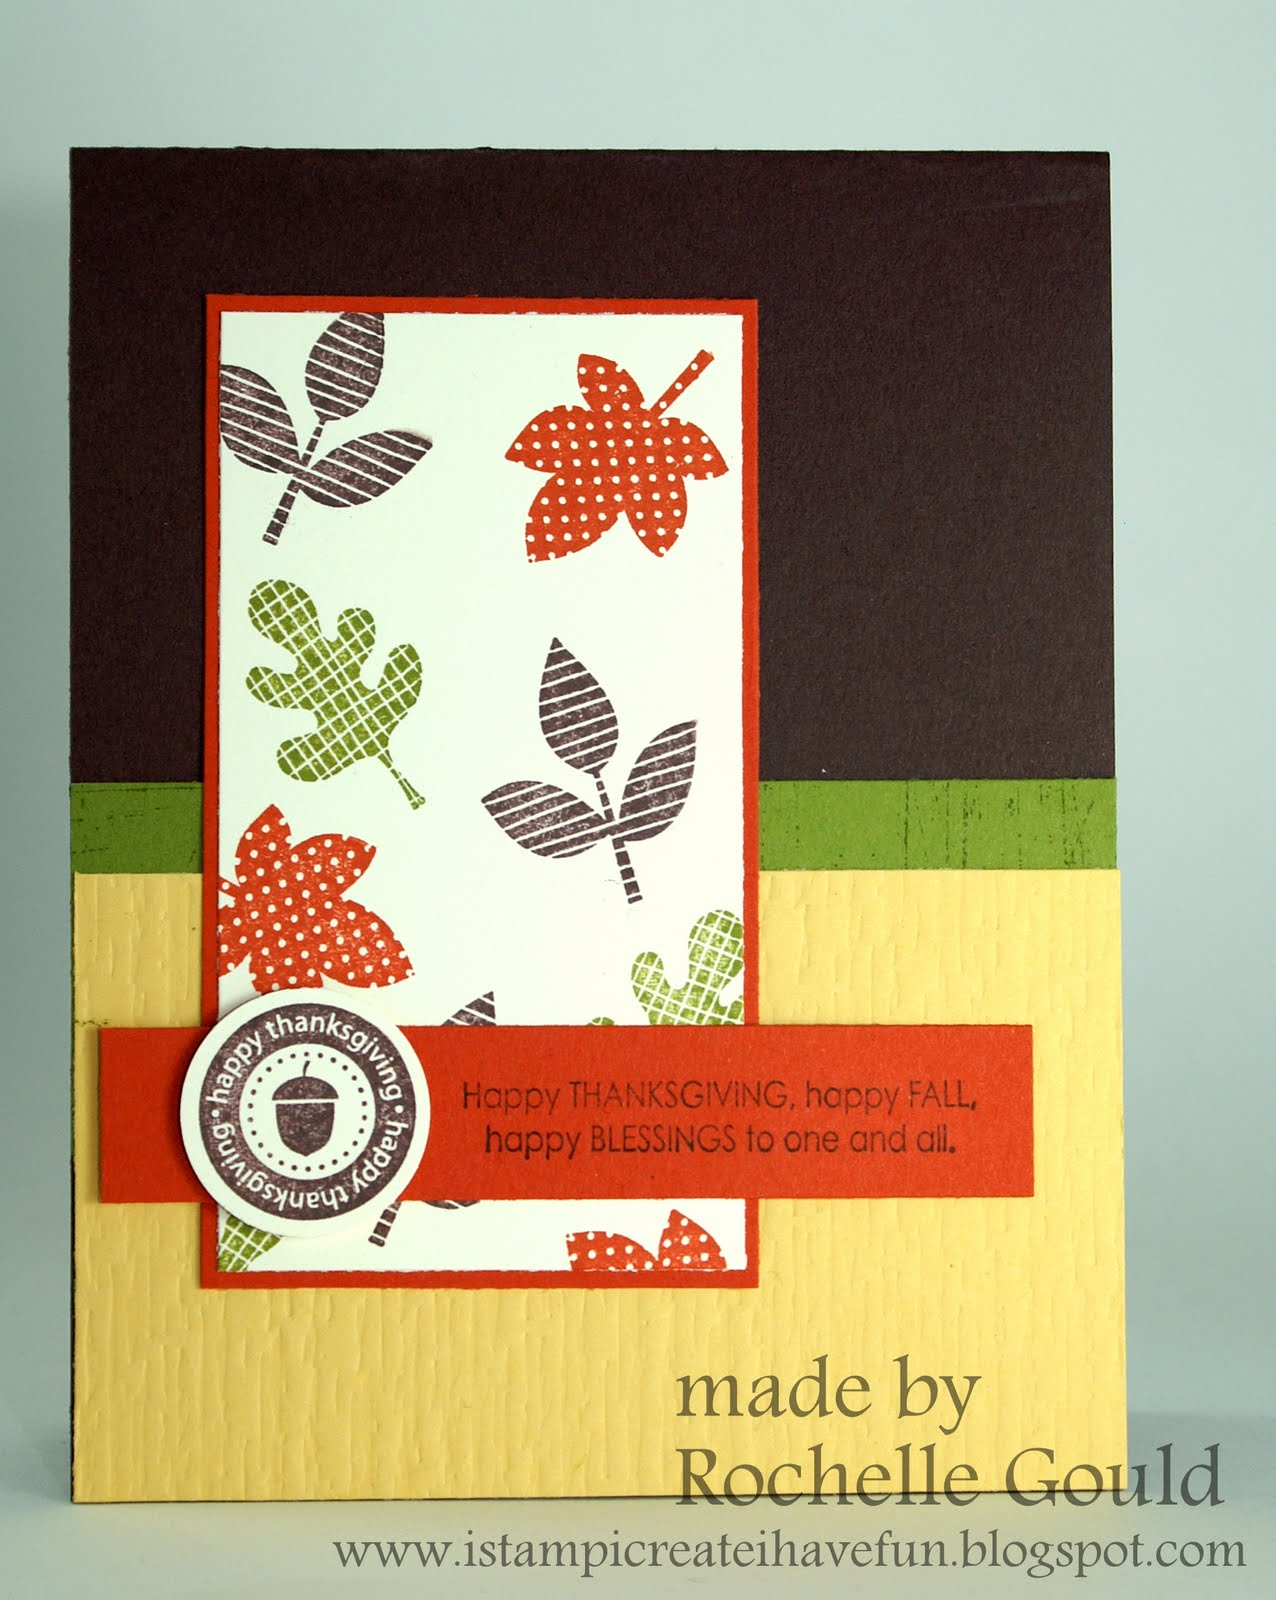
Falling Thanks


Happy Thanksgiving!

Here is a card we made recently at my stamping club. What a great Thanksgiving card. I love the Falling Leaves stamp that is in the catalog. The leaf images are so fun!

The colors in the card are Chocolate Chip, Old Olive, So Saffron and Really Rust. What great colors for a fall card.

Thanks to JosannaP over at Splitcoast for the wonderful inspiration and layout of this card!

I hope you all have a wonderful Thanksgiving!

Sunday, October 18, 2009

Sweet Treat Bone Mix


Halloween is just around the corner, so I thought I would share a Halloween project with you.

This is a card we made at club last month. It uses the Sweet Treat Cups from the Holiday Mini. I was trying to think of what you could put inside of it besides candy and saw these plastic skeletons while grocery shopping and thought wow...how easy it would be to cut him up and put the bones in the Sweet Treat Cup, so that is what I did!

This card has a few details that I will point out to you:

To the bone mix I also added a few orange beads from the Orange Duo and two small googly eyes and called it good (this picture gives you a better look at the beads and the bones).


I added two brads and an Orange "diamond" to the card to give it more detail (the Orange "diamond" came from the circle Fire Rhinestone Brads, I just took off the brad part of it and used the "diamond" with a mini glue dot). I also textured the Basic Black piece of card stock using my Big Shot and the diamond texture plate.


The sentiment was stamped on Very Vanilla card stock is Versa mark, embossed in black embossing powder and then punched out using the Modern Label punch. Then two more Modern label's were punched and layered behind the one with the sentiment on it. All layers were sponged with some Basic Black and Sahara Sand ink and attached to the card using Dimentionals.


The whole card thought out the steps was sponged to make it look a little more spookier! Here is the finished product again. It measures 4 1/4" square.

If you have any questions, please let me know!

Thanks for looking!

Friday, April 10, 2009

April Club


This month for club we did a few Easter cards. I think every one liked them.

The first card we did was this cute punched bunny. I have seen many of these bunnies on Splitcoast, and decided to make one myself. I added the weaved background (basket) and the grass to give him something to sit by and on. The "happy" is from the Happy Everything stamp set and the "easter" is from the retired hostess level 2 set called Occasions Collection.


The second card we made was also an Easter card. This is called a hinged card, because it opens on a hinge.

All of the stamped images are from the Wagon Full of Fun stamp set in the Occasions Mini catalog. The colors are Old Olive, Rose Red and So Saffron. This card measures 41/4" X 41/4", so it fits into a standard envelope.

The "happy easter" sentiment is from the retired hostess level 2 set Occasions Collection. This was a fun and pretty quick card to make.


The last card we made was this one using the Branch Out stamp set. I CASE'd this card pretty much all the way from geobeck on Splitcoast. I saw it and loved it! I did change the DSP. I used the Sweet Slumber Specialty which has a wonderful texture to it. The ribbon is the Satin Baja Breeze from the Valet Ribbon Originals. The colors are Chocolate Chip, Baja Breeze, Whisper White and Kiwi Kiss.


Thanks for looking!

Monday, March 9, 2009

March Club

It's time for March Club already! This month I had a guest demonstrator (my sister) prepare and demonstrate one of the cards that everyone made, you will see it down further on this post!

The first card we made is this Crimped Envelope Pocket Card that uses the Sale-A-Bration stamp set Polka Dot Punches and the Sale-A-Bration Ribbon Bundle So Saffron ribbon. (You can find the tutorial on how to make a Crimped Envelope Pocket card on Splitcoaststampers by clicking here). The colors on this card are Certainly Celery, Bashful Blue, So Saffron and Whisper White.

This stamp set coordinates perfectly with t
he Scallop Circle and 5-Petal Flower punches, so I used them to punch out the embellishments on the bottom right of the card. I also used the 3/4" circle punch and the Circle Scissor Plus to get the other circles on the card. I added a small Whisper White button, from the Button Latte Designer Buttons pack, and a small piece of Whisper White ribbon to finish off the outside of the card. When you take the top off the card, this is what is inside. I used the Scallop edge punch on the Certainly Celery card stock to give it some character.


The next card uses the Inspired by Nature stamp set that is on the Dormant List. The flower looks like it was water colored onto the paper and I did this by coloring directly on the stamp with the appropriate markers (Summer Sun, Old Olive and Pink Passion), "huffing" the stamp, stamping it onto the Water Color paper and then Aqua painting the stamped image on the paper to make it blend better. I framed it with Basic Black card stock and adhered it to the rest of the card.


The Kraft card stock was run through the Big Shot with the Stampin' Up! Backgrounds 1 texturz plate and then I added three black brads at the bottom of the card to finish it off.


The last card we made was the one my sister prepared. It uses the Trendy Tree's Stamp set, 5/8" Grosgrain Regal Rose ribbon, Chocolate Chip, Regal Rose, Old Olive and Whisper White card stock, a Clear Transparency sheet and the Photo Corners punch.

This second picture shows that she put the Clear Transparency sheet over the Whisper Whit card stock that she stamped the Trendy Tree's on. This is such a cute stamp set and it has so much potential!


Thanks for stopping by!
Have a great week!

Saturday, February 14, 2009

February Club


This month in club we did two new techniques, the View Master card and stamping with Bleach.

The first card was the View Master (tutorial coming soon to my blog!). A View Master card has a built in paper wheel that you turn to make the different images show up in the hole you punch (does that make sense?) I chose to use the Owl Together Now stamp set because I thought it would work well for this kind of card.

The colors in the card are Chocolate Chip, Bashful Blue, Whisper White, Close to Cocoa and Old Olive. The wheel rotates so you see another owl and then a saying from the stamp set.


The next card we made used the stamping with bleach technique. Depending on what color of card stock you use, the bleach will change it different colors. So my advise it to always do a test stamp in bleach first on a scrap piece of card stock to see if the bleach does what you want it to do.

The colors I used in this card are Barley Banana (card base), Baja Breeze, Chocolate Chip and bleach (the bleach is the yellow-y color on the daisys). The Stamp set is Upsy Daisy, and DSP comes from the Chocolate Chip Patters DSP and the ribbon is the 5/8" Chocolate Chip grosgrain. I also used the Stampin' Up! Backgrounds 1 texturz plate (the biggest dots) with my bog shot to give the Baja Breeze some texture.

Thanks for looking!

Thursday, January 15, 2009

January Club

This is will be our last club before the new catalog comes out next week. I am excited for the new catalog, because it always brings new and exciting things!

Since Valentines Day is just a month away, I thought we should do a few Valentines Day-ish things. Our first project is this cute little Valentines bag. It is made using the Big Shot Top Note Die and a small paper bag (for the inside of the bag). The handle is punched out using the large oval punch and the embellishment is made using the 1 1/4", 1 3/8" and Scallop circle punches. The heart stamp and the DSP is from the level 3 hostess set Holiday Happening Bundle in the current catalog. The ribbon is the 1 1/4" Grosgrain in Pink Pirouette. I made the bag's filling by cutting real thin strips of Real Red card stock and then crumpling them in my hands.

The second project is this 3"x3" Valentine. It uses A Happy Heart stamp set from the Holiday Mini catalog (which goes away January 18, so if you like it order it now!) The color scheme for this card is Riding Hood Red, Pink Pirouette and Whisper White. We used the Stampin' Write markers to ink the stamp to get the flower to be different color than the stem. The DSP is from the Bella Rose paper pack and the ribbon is the Riding Hood Red Taffeta.
This second picture shows the paper piercing around the edge of the Pink Pirouette DSP and that the flower is made from small little hearts.


Our third project is this no stamping required card! It is made using the Big Shot and a few dies! I was having a hard time coming up with Valentines day cards to make (mainly because I don't have many heart-y, love-y stamps) and I was thinking X's and O's are Valentines Day things and I could cut them out using my Serif Essentials dies and my Big Shot, so I did! And then I thought a cute little white bird may look good, so I cut him out using the Birds And Blooms Sizzlits die and and then glued it all together! It is kind of a different card for me, but I think I like the way it turned out, very simple and quick!


Our fourth and final card for club this month is this Sock Monkey "thanks a bunch" card. The colors in this card are Whisper White, Close to Cocoa, Creamy Caramel, Chocolate Chip, So Saffron and Ruby Red (for his mouth and butt). I stamped the Sock Monkey in Basic Black and then colored him in using the markers. I then stamped the banana on a scrap piece of Whisper White card stock using Basic Black ink, colored the banana peel using the So Saffron marker and then cut the banana out and glued it to the monkeys hand. I had to add some ribbon (of course it had to to Chocolate Chip) to finish off the card!

Thanks for looking!

Friday, December 12, 2008

December Club


Here is the card that we made for club this month. It uses the emboss resist technique. I think this card makes a good masculine card.

The emboss Resit technique is really pretty simple. All you do is pick a DSP, rub your embossing buddy over it, ink your stamp with Versa Mark, stamp it, pour clear embossing powder on it, emboss it, then sponge a darker color (here I used Always Artichoke) all over it and you will begin to see your embossed image pop! If you can't see your image very well, just sponge more ink on to it!

The colors in the card are Chocolate Chip, Craft and Always Artichoke. The DSP I used is from the Manchester paper pack. The tree stamp is from Lovely as a Tree. I used the linen thread to tie around the Always Artichoke paper to finish it off.


The other project we did in club this month was the little lanterns with the tea lights in them. I did a tutorial on them a few monthes ago on here. You can find it by clicking on the "Tutorial's" link and then look for the Lanterns.

Sunday, November 16, 2008

November Club Cards


Here are the cards that we made this month for my club.


The first card features the Cracked Glass Technique. You do this by "smooshing" Versa Mark ink all over your stamped image and then sprinkling Glassy Glaze Enamel over that and then embossing it. You do this three times, so you have three layers of Glassy Glaze Enamel on to your stamped image. You then put your paper you just embossed into the freezer for about 5 mins. When you take it out you just crack the "glass" by bending the image in a few different directions. Here is a close up of the crack glass.


The card stock that I used to make this card were Really Rust, Chocolate Chip and Very Vanilla. I used Really Rust, Chocolate Chip, Sage Shadow and More Mustard classic ink to stamp the images and Glassy Glaze Enamel and Versa Mark to make the "glass". Other accessories I used were 5/8" Grosgrain Chocolate Chip ribbon, Linen Thread, the Scallop Edge punch, the 1 3/8", 1 1/4" and the 1/16" circle punches. To make the background image I used multiple stamp sets, they include Itty Bitty Backgrounds (little dots), Priceless (little flower), and Season of Friendship (the leaves) and the sentiment is from the Hostess set called Best Yet.

((You may recognize this next card from an earlier post on my blog, this is the card I submitted for the soshelli.com creative challenge, but I liked it so much I wanted to share it with my club!))


This was the Thanksgiving card that we made. The main image (the Pumpkin) is punch art. It is made by punching out five Wide Ovals sponging around them and gluing them together in a pumpkin shape.


The card stock I used for this card is Very Vanilla, Old Olive, Chocolate Chip, Close to Cocoa, Pumpkin Pie (how appropriate! :) ) and So Saffron. The pumpkins stem is made with a little piece of 5/8" Chocolate Chip Grosgrain ribbon folded in half. The Vines are made from the 3/4" and the 1/2" circle punch punched out and then cut into a spiral shape. The "hay" is the So Saffron paper cut into thin strips and then crumpled up.


There wasn't much stamping on this card, but the stamp sets I used were Celebrate Everything (Celebrate) and Fundamental Phrases (thanks). I did use the Stamp-a-ma-jig to line up the two words.


The last card that we made was a simple Christmas card. It seems like Christmas is so far away, but it will be here before we know it!

The paper used for this card is Chocolate Chip, Riding Hood Red, Whisper White and Holiday Treasures DSP. The ribbon is the 5/8" Chocolate Chip Grosgrain. The cute little reindeer is from the A Holly, Jolly Christmas stamp set.
I stamped the reindeer in Chocolate Chip Craft ink and then clear embossed it. Then I colored in the nose and put a drop of Crystal effects on his nose! I think you can tell which reindeer he is!

Thanks for looking!


Friday, October 17, 2008

October Club Cards

These are the projects that we did for club this month. They all are a little fall-ish!


The first one is a Bag-Box. These cute bag-boxes are simple to make and would be great to use for any occasion (mine is a Halloween themed one for this time of year!). The supplies that I used are:

Ghostly Greeting DSP
Batty for You stamp set
Basic Black card stock
Whisper White card stock
Basic Black ribbon
Scallop Circle punch
Scallop edge punch
1 3/8" circle punch
Tab punch
Crop-a-Dile
Stapler
Double sided tape

I am going to post a Tutorial on how to make these cute little bags soon!

The next project is this fall card. I used the Season of Friendship stamp set from the Holiday Mini. I think this stamp set has a lot of potential, because it comes with the leaves you see here, a snow flake, a flower and a bird for you to decorate the tree with. You could make so many cute seasonal or non seasonal cards with this set!

For my card I used Mellow Moss, Really Rust and Whisper White card stocks. The leaves are stamped in Mellow Moss, Really Rust and More Mustard. The sentiment at the bottom reads "The season of friendship lasts forever"and it is stamped in Chocolate chip. The ribbon is the Chocolate Chip double stitched grosgrain.


The last project we did is this card using the Eastern Blooms stamp set. The branch image is stamped in Chocolate Chip craft ink and then embossed with clear embossing powder. Then I put small dots of Crystal Effects in the middle of all the flowers and then poured the Orange Micro beads (these beads are TINY!!) all over the image, so the beads would stick to the middle of the flowers. Here is a close up of the flowers with the beads.


The card stock I used was Chocolate Chip, Very Vanilla and Tangerine Tango. The DSP is from the Haiku paper. The "ribbon" is the 3/8" Twill Tape. The greeting is from the stamp set Thank You Kindly and is also stamped with the Chocolate Chip craft ink and then embossed with the clear embossing powder.

Thanks for looking!

Thursday, September 18, 2008

September Club Cards

Here are the Cards that we are doing in my monthly stamping club. The first one is our Halloween card. It uses the Ghostly Greeting DSP, Elegant Eggplant, Basic Black and Whisper White card stock, the new 5/8" Tangerine Tango Grosgrain ribbon, Haunting Halloween stamp set and a few black eyelets. I think the way the card is folded makes it look taller for some reason.


I sponged all the edges of the DSP, Whisper White and Elegant Eggplant card stock with the appropriate colors. The inside reads "... a haunting Halloween!"

The next two cards each use a stamp sets that is currently on promotion with SU for 15% off. They are both brand new sets to this catalog and I love them both!!


This card uses the new Urban Garden DSP, Kiwi Kiss, Whisper White and Not Quite Navy card stock, 1" double stitched grosgrain ribbon in Baja Breeze, the new Pocket Silhouettes stamp set, the new scallop edge punch, a 1/16" circle punch, the 1 1/4" square punch, a corner rounder and a silver brad.

This card could be changed so easily by using any of the DSP's and a coordinating stamp set.


This card uses the new Upsy Daisy stamp set (this set has sooo much potential!!), the Bella Rose DSP, Chocolate Chip, Riding Hood Red and Whisper White card stock, the 1 3/4" circle punch and the Coluzzle Cutting System. The daisy's are stamped in Riding Hood Red and Tangerine Tango.
I use ribbon a lot on cards, but this card has no ribbon, and I think it looks good that way!