Supplies:
Solid/Bold stamp set (I used Halloween Frights from SU)
Basic Black Card stock
Black Staz On
Vellum (I used vellum card stock)
Scrap paper
Creaser of your choice
1 3/8" square punch
Red Sticky Strip
Snail (or other adhesive)
Scallop Edge punch
1/8" circle punch (smaller circle on the Crop-A-Dile)
Directions:
1. Cut your black card stock at 8 1/4" x 3"
2. Crease your black card stock at 2,4,6,8". This is what it should look like now:

3. Punch a 1 3/8" square out of your scrap paper. (You will use this as a guide so you punch the window out of your box at the right place.) Put a small piece of tape on one side of the 1 3/8" square and place it on your creased black card stock where you want your window to be, like this:

4. Now take your square punch and line up your punch with your scrap piece of paper and punch it out:

Repeat step four until all four squares are punched:

5. Punch the top edge of your black card stock with the Scallop edge punch and then punch the middle of the scallop out the the 1/8"" circle punch (Crop-A-Dile):

6. Cut out 4 squares of vellum at 1 3/4" x 1 3/4"
7. Stamp your images on your vellum squares with Staz On and let dry:

8. Use the snail adhesive to glue your vellum squares to the black card stock over the squares you punched out:

This is what is should look like now:

9. Fold on all the creased lines
10. Put stick strip on the skinny "good side" of your box:

11. Peel the red backing off your sticky strip and stick the box together:

12. Put a fake battery operated flickering tea light in the middle and you are done!

To Change things up a bit, you can make your box taller! You will do everything else the same, except for punching the squares out and cutting your vellum to fit over your squares.
(I cut this one at a height of 4 1/4")
1. Punch your 1 3/8" square out. To make sure that they are centered line up the bottom of your punch with the creased lines, (here I used a white gel pen to show you the creases better)

This is what it will look like with one square punched out.

2. To make the rectangle, you need to line up the 1 3/8" square punch with the first square punch you punched:
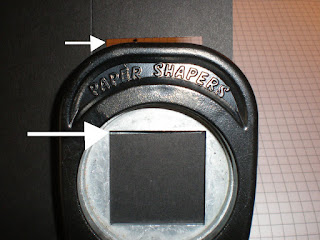
The top (smallest) arrow is pointing to the top of the first square you punched out. The bottom (bigger) arrow is pointing to the bottom of the first square you punched out. It is important that you line up the bottom of the first punched square with the punch as you punch the second square out. If you don't then they will not line up.
When you have have that done this is what it should look like:

Continue punching out the squares until all four sides are done and then cut your vellum to the appropriate size, stamp your images, glue the vellum to the cards stock and make into a box!

You can see in this picture there are three different sizes of boxes.

 The stamp sets used were Bella Blossoms and Canvas (stamped on the Sage Shadow for the background). Other accessories used were Pumpkin Pie ribbon and a clip from SU's Clips Assortment.
  dimensionals. This pictures shows that a little better.
 dimensionals. This pictures shows that a little better.


 This is a picture frame that I made. The frame is one of those that has


